In Monster Hunter Wilds, most weapons fall into two categories: those with straightforward mechanisms that are generally easy to handle, and those with intricate mechanisms that can be challenging to master. However, the Heavy Bowgun stands out as it has quite basic mechanics but is tough to employ effectively against certain monsters due to its complexity in practice.
At its peak, the Heavy Bowgun ranks among the game’s highest-inflicting weapons. However, it needs the appropriate assistance, encompassing both playstyle and equipment configuration. We’ll introduce a variety of skill enhancements that will significantly improve your Heavy Bowgun experience, transforming it from good to exceptional.
In Monster Hunter Wilds, the construction and concepts are still evolving, so there’s no ultimate best build at the moment, or perhaps there won’t be one in the future. However, this Heavy Bowgun build serves as a solid starting point for your exploration, offering you a chance to delve deeper into customization options.
Heavy Bowgun Build Overview
As a gamer, I’ll be leaning heavily on keeping my health and stamina intact with this build. To make it smoother, I’m planning to stick to my trusty Steadfast companion, Seikret, for most of the journey. This strategy works best when using the Heavy Bowgun, making traversal less stressful compared to other weapons.
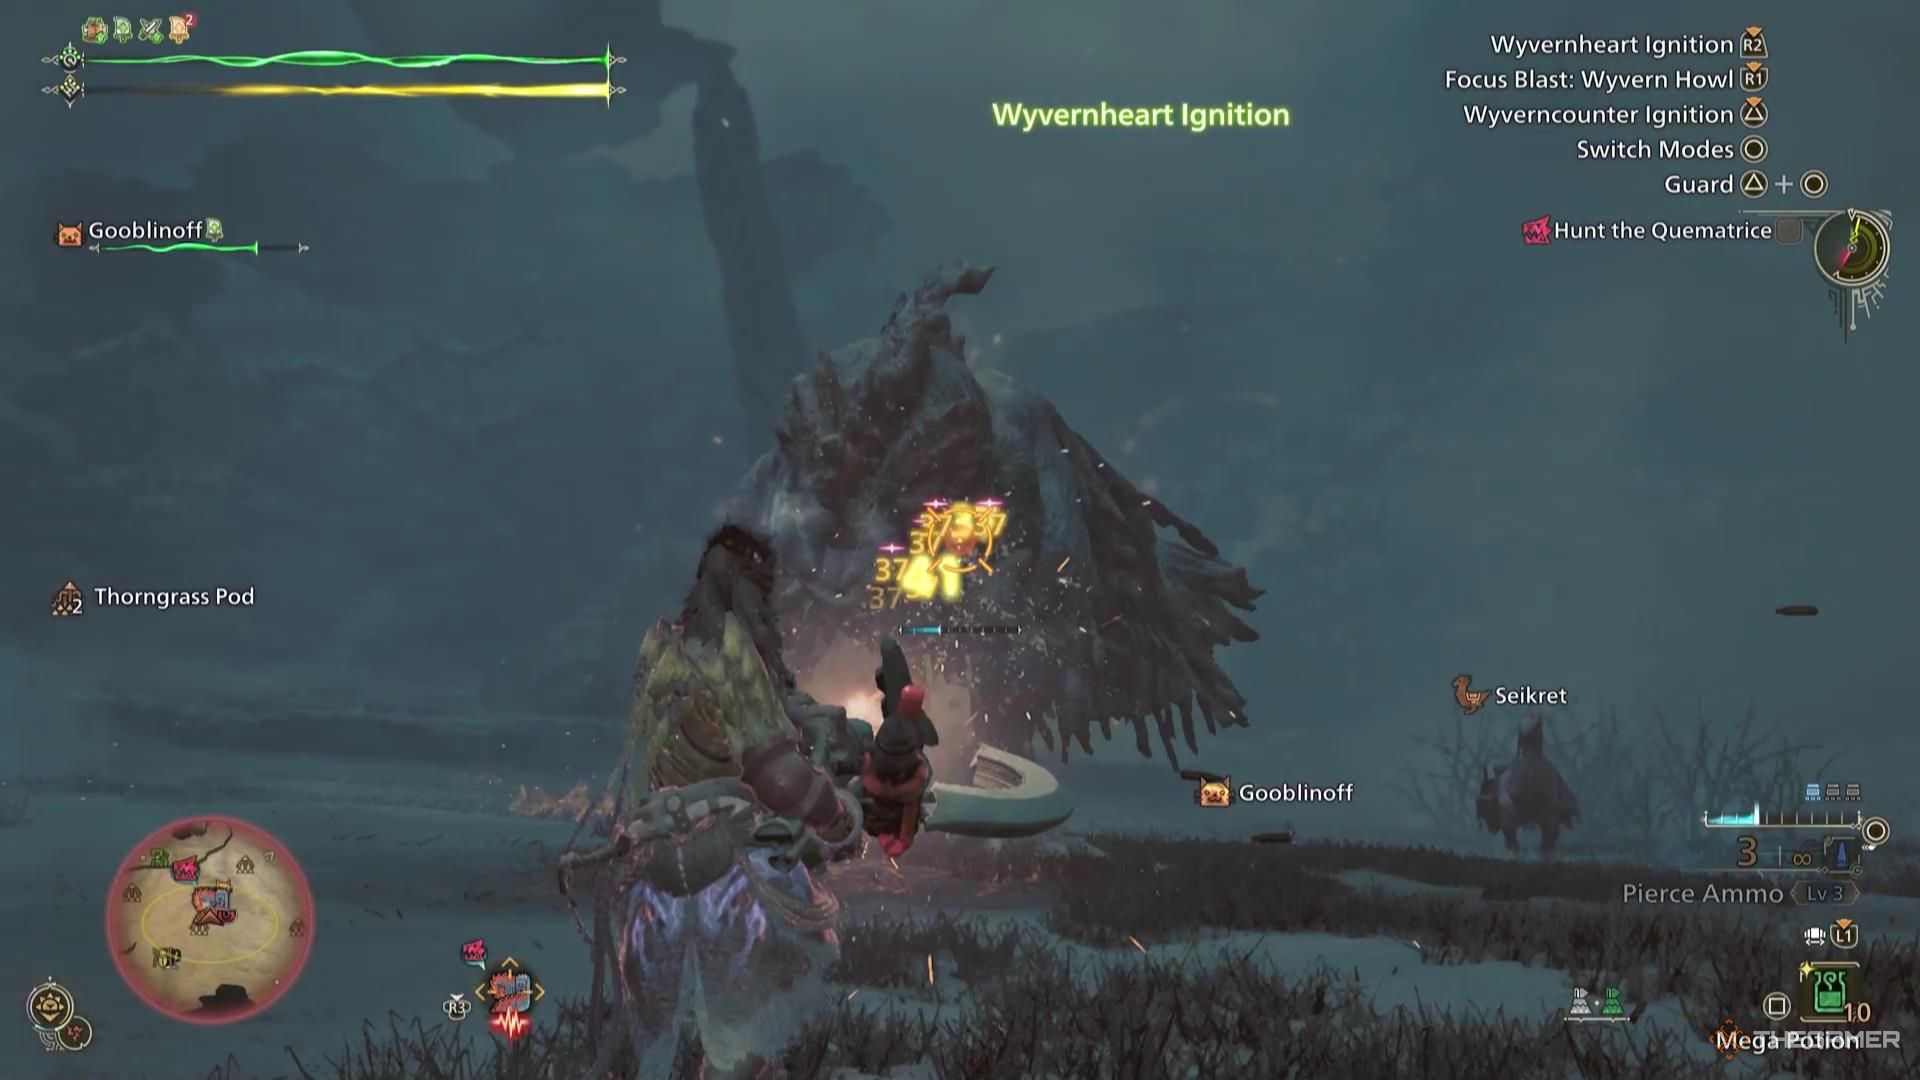
Though the Ignition Mode isn’t accessible on the rear side of our Seikret, it’s capable of launching Pierce Ammunition from there. Additionally, Focus Strike can be employed too. Throughout most of the battle, we’ll have our ability enhancements active.
Heavy Bowgun Build Overview
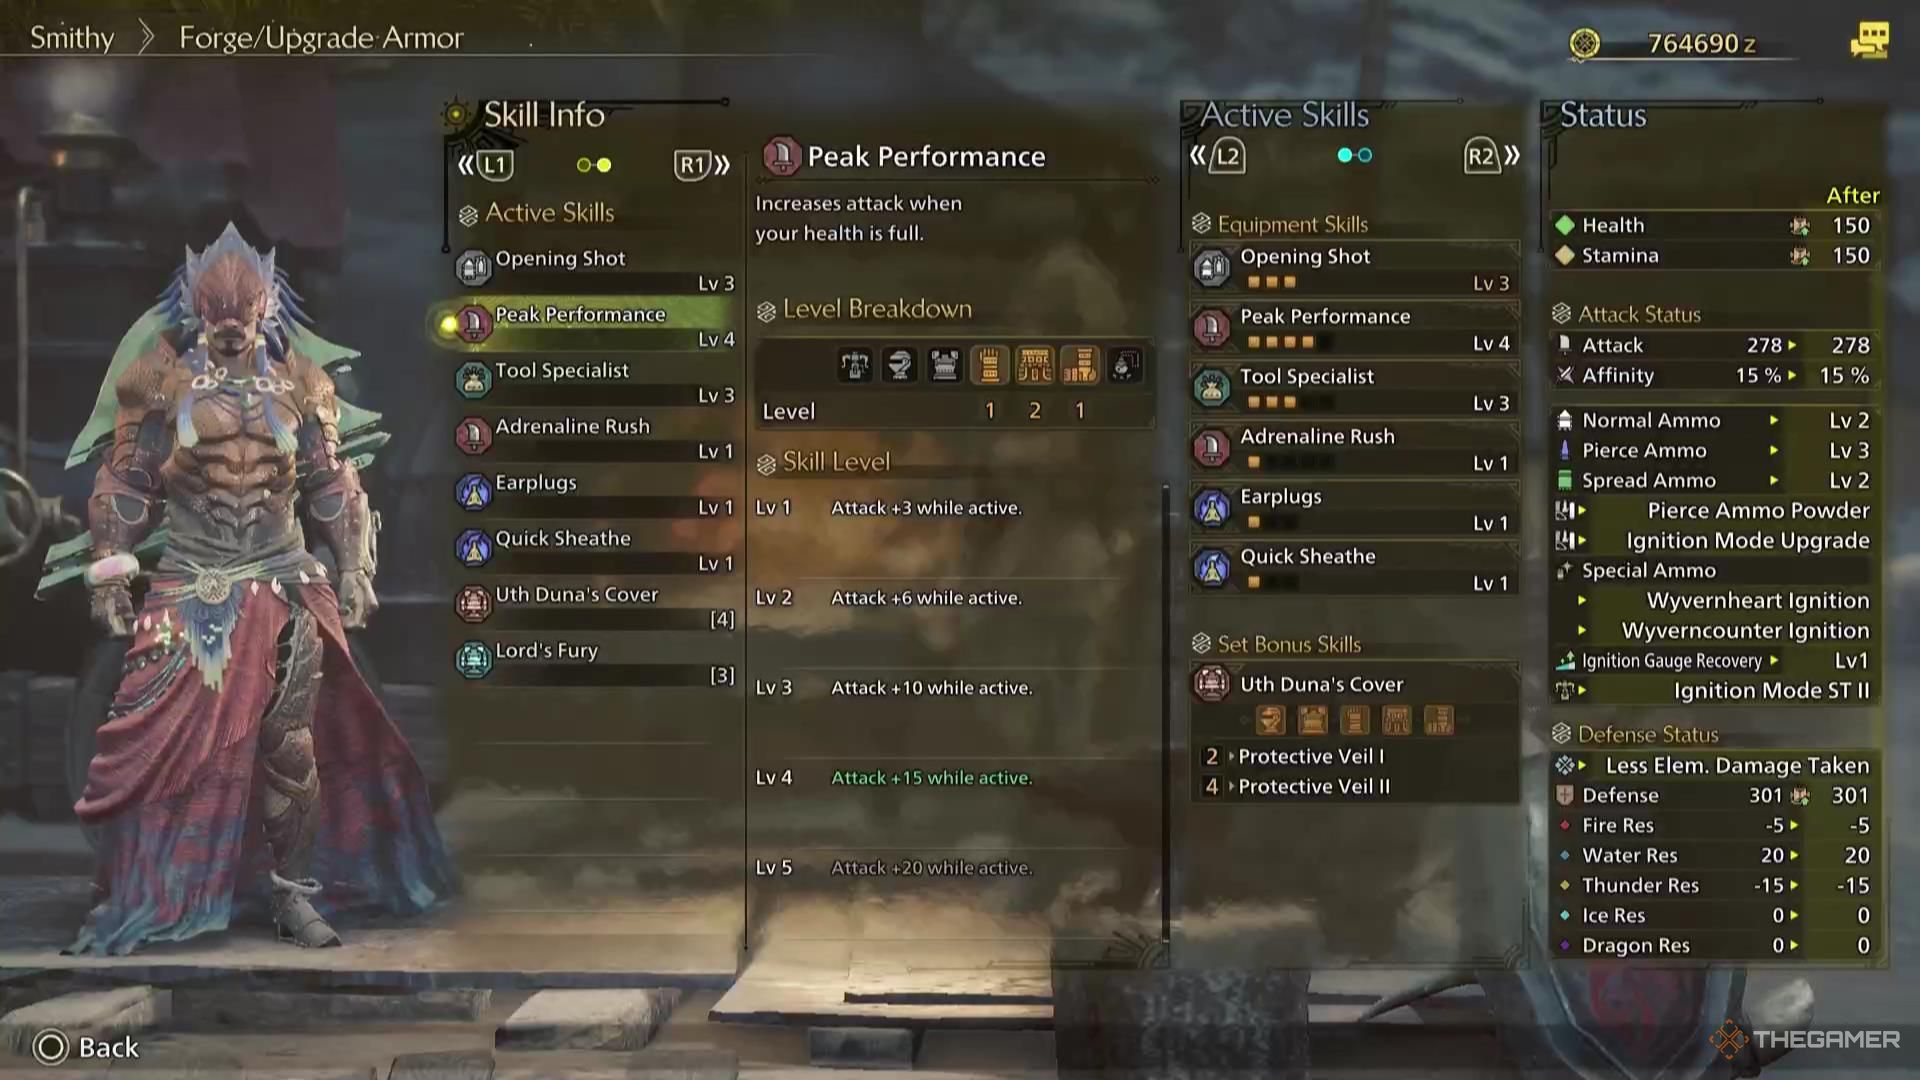
This construction will incorporate armor pieces from two distinct sets: the Uth Duna b set and the Rey Dau a set. While the special abilities these armors offer won’t play a key role in this design, their equipment skills certainly will.
| Slot | Item | Effect | Decoration |
|---|---|---|---|
| Weapon | Artian Heavy Bowgun | Pierce Ammo Powder | Ignition Mode Upgrade | Wyvernheart Ignition | Wyvernblast Ignition | Opener Jewel | Opener Jewel | Opener Jewel |
| Head | Rey Sandhelm a | Latent Power II | Evade Extender I | Thunderous Roar I | |
| Chest | Rey Sandmail a | Maximum Might II | Stamina Surge I | Thunderous Road I | Medicine Jewel | Medicine Jewel |
| Hands | Duna Windbraces b | Peak Performance I | Quick Sheathe I | Protective Veil I | Chain Jewel | Medicine Jewel | Physique Jewel |
| Waist | Duna Windcoil b | Peak Performance II | Protective Veil I | Chain Jewel | Physique Jewel |
| Legs | Duna Wildgreaves b | Peak Performance I | Protective Veil I | Chain Jewel | Physique Jewel | Physique Jewel |
| Talisman | Unscathed Charm | Peak Performance I |
When it comes to our character, the Mending Mantle will likely be the optimal choice for its effectiveness. This is because the highest benefit from this build setup is achieved when our character is fully healthy.
Skill Effects
This combination of armor and decorations is going to give us these skill effects:
| Peak Performance V | This will significantly increase our attack when our health is full. This is one of the key aspects of this build, and it’s going to be important to make sure it comes into effect. |
|---|---|
| Latent Power II | This is going to increase our affinity either after we take a big portion of damage (not ideal) or after we’ve been fighting a monster for a short period of time (ideal scenario). |
| Evade Extender I | This will increase our evasion distance. We’ll ideally be on the back of our Seikret when taking damage is a possibility, but on the off-chance you do need to evade an attack, this can’t hurt. |
| Maximum Might II | This is going to increase our affinity once our stamina has been full for a short time. Since our stamina should be full more or less all the time, this is going to be active often. |
| Stamina Surge I | This is going to speed up our stamina recovery. |
| Burst III | This is going to increase our attack for a short period after landing hits. We’ll be landing hits regularly with our normal attack, but this is really going to shine once we’re using the rapid-fire attack in Ignition Mode. |
| Recovery Up III | This is going to increase the amount that we heal. Since we need our health full as often as we can manage it, this is going to make a noticeable difference. |
| Constitution IV | This, again, won’t be pivotal, but will reduce the stamina that we exert when we do things. When in a situation where we have to guard against an attack, this is going to help us not wipe out our stamina bar right away. |
| Opening Shot III | This skill effect is going to make a huge difference to our quality of life. This increases the speed of our reloads, which is going to increase our damage-per-second considerably. It also increases the attack of our bullets when we’re fully loaded. |
By maintaining your power reserves, you’ll inflict much greater damage in combat. However, if you get struck, you’ll find yourself playing defensively.
How To Play This Heavy Bowgun Build
To get the most out of this build, try to stick to stealth mode as much as you can, especially if you’re playing alone. However, when teamed up with other Hunters, it won’t be as pressing a concern since they’ll be dividing the attention. But when you’re by yourself, you might end up using too much stamina and taking too many hits for this build to truly shine.
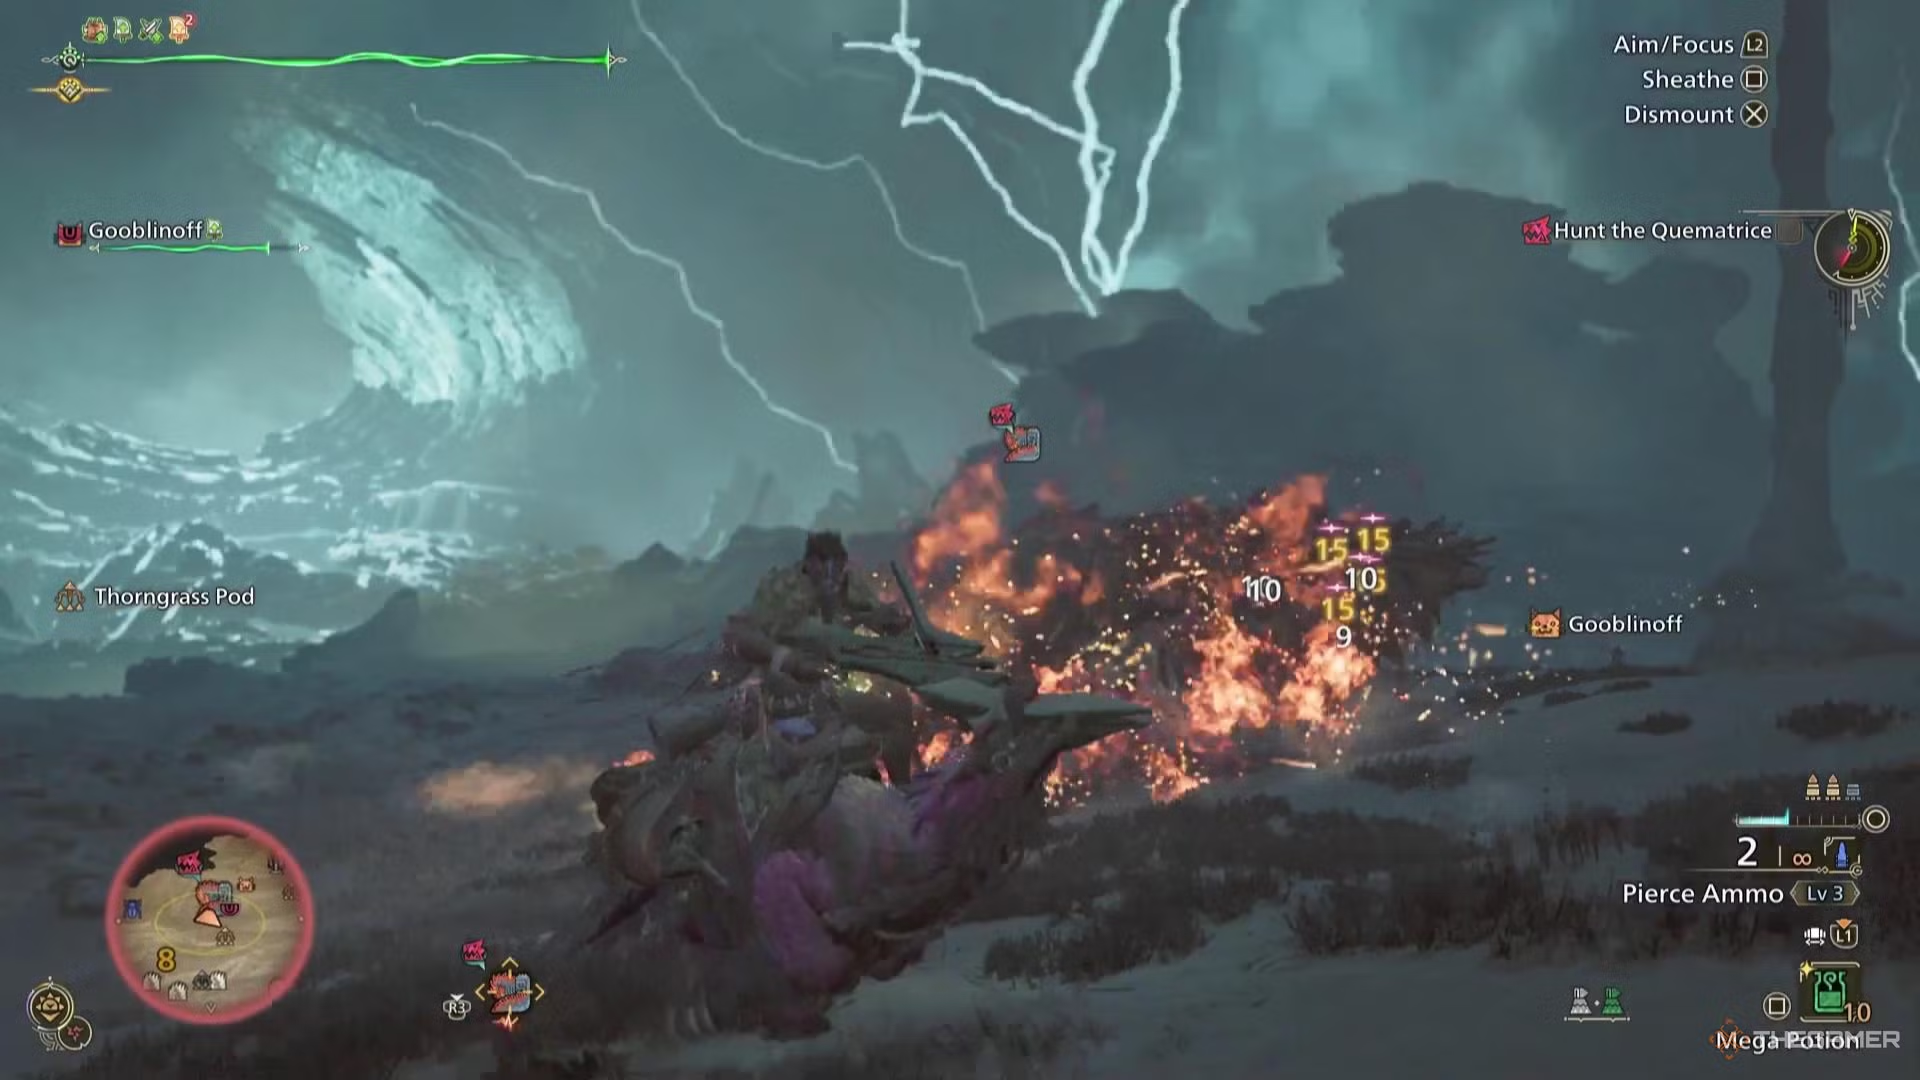
As a dedicated fan, I’d suggest that if you consistently ride your Secret steed while unleashing your Penetrating Ammunition at the beast relentlessly and maintaining a safe distance, you’ll be dealing consistent, substantial damage to the monster. Over the course of time, these attacks will start causing wounds, and that’s when we’ll truly take the fight to the next level.
Once you’ve caused injury, follow up with a Precise Attack. If the enemy is rendered immobile, swiftly dismount from your Stealth Horse and transition into Overdrive Mode. Unleash a barrage of rapid-fire attacks on the creature, which will inflict immense damage, especially when combined with our Boost/Optimal Speed combo.
Equipping your Palico with a weapon that causes sleep or paralysis will provide additional chances for you to employ quick, risk-free attacks too.
Read More
- Clash Royale Best Boss Bandit Champion decks
- Vampire’s Fall 2 redeem codes and how to use them (June 2025)
- World Eternal Online promo codes and how to use them (September 2025)
- Best Arena 9 Decks in Clast Royale
- Mobile Legends January 2026 Leaks: Upcoming new skins, heroes, events and more
- Country star who vanished from the spotlight 25 years ago resurfaces with viral Jessie James Decker duet
- How to find the Roaming Oak Tree in Heartopia
- Solo Leveling Season 3 release date and details: “It may continue or it may not. Personally, I really hope that it does.”
- M7 Pass Event Guide: All you need to know
- Kingdoms of Desire turns the Three Kingdoms era into an idle RPG power fantasy, now globally available
2025-03-14 11:36