Overview
- B1 Tetra-Overspec Electric Defender unit that provides cooldown, DPS and buffs.
- The second coming of Crown in terms of powercreep in Nikke. While she doesn’t render all B1s irrelevant, she raises the floor and ceiling a ton.
- Big personal DPS and big buffs alongside proper, unconditional cooldown means that she is going to be the best B1 to use in almost all situations.
- While she has the option to either be a re-enter B1 or a regular B1, it is generally better for the time being to use her as the standalone B1 unit, unless her healing is really needed.
- Some of the greatest Electric DPS available, on top of all that she provides, makes her a must-have for any account.
Should You Pull?
Absolutely. Anis: Star is one of the strongest Electric damage dealers in the game, and she does a lot! She deals high damage herself, provides excellent buffs that reduce skill cooldowns (which are often weak on other characters), and consistently lowers cooldowns while also building up her Burst meter. Combining all of those abilities into a single unit is incredibly powerful. Many players believe she’s as impactful as the character Crown was at her peak.
Since the Crown unit, no other unit has significantly changed the power levels within its Burst window. While newer B3 units are generally stronger than older ones, this increase in power isn’t as noticeable as with B1 or B2 units. This is because B3 units are often used in raids when they have a type advantage, and while type advantages are helpful, they aren’t as crucial for success in the main campaign.
Anis: Star boasts strong Electric damage, but her real strength lies in being a versatile B1 unit. Because her B1 slot provides excellent buffs and cooldown reduction without any special requirements, she remains valuable even when facing enemies resistant to Electric attacks. She’ll help teams overcome difficult challenges in the campaign by boosting their overall power and quickly eliminating enemies. In raids, she’s a key B1 unit, effective against Electric-weak enemies and a solid choice for any raid battle.
When choosing between Neon: Vision Eye and Anis: Star, Anis: Star is the stronger pick. While Neon: Vision Eye looks promising, Anis: Star offers more overall benefit to a team because she’s a B1 cooldown unit. Her ability to boost stats, deal damage, and reduce cooldowns – all independently of other units – makes her the better choice for campaign stages, especially compared to Little Mermaid (Siren, LM), who relies on Machine Gun units to be effective. Anis: Star will likely remain the top B1 pick for a long time.
If possible, aim to get at least one copy of Anis: Star. While she becomes even more powerful with multiple copies, even just one will significantly improve your account’s performance compared to not having her. The benefits she provides are immediately noticeable and substantial.
Newbie/Incomplete Box Section
Anis (also known as TTAnis, Anistar, or AnisTT, though most players simply call her Anis) is a powerful Electric Defender in Battle Royale. She offers both cooldown reduction and significant damage output. What sets her apart from other defenders who reduce cooldowns is that Anis doesn’t have any balancing drawbacks to limit her effectiveness. Note that the ‘Sparkling Summer’ version of Anis has already replaced the original ‘sAnis’.
Overall, AnisTT offers some of the strongest buffs in Battle 1, comparable to those of Tove, Miranda, or Label. However, she uniquely provides cooldown reduction alongside these buffs. Like Siren, she deals a lot of damage herself, but her high damage output is consistent in most situations, unlike Siren, who needs Machine Guns to frequently activate her skill to maximize her damage.
Beyond simply reducing cooldowns, increasing damage, and providing buffs, AnisTT also has a Burst generation boost. While 6% might not sound like much, it’s actually very impactful because she’s frequently used as a main Rapid Launch support. This consistent Burst generation helps her team consistently execute powerful burst attacks at the right moments.
AnisTT can technically fill the B1 role again, but it’s generally not a good idea if you already have another unit in that position. Doing so significantly weakens her, reducing both her team support and her personal damage output. She also won’t help with cooldown reduction when played this way. Unless you desperately need extra healing or haven’t fully upgraded her yet, there’s no real benefit to using her as a second B1.
Basic Information
- Skill 1: Starfall
- Skill 2: Stardust
- Burst: Star Anis
- Cooldown: 20s
- Rarity: SSR
- Burst: I
- Weapon: RL
- Class: Defender
- Element: Electric
- Manufacturer: Tetra – Overspec
- Squad: Counters
- Weapon Name: Twinkle Star


A ridiculously overloaded kit, more than befitting for an anniversary unit
Skill 1: Starfall
This ability activates at the start of battle, as long as the user is alive, and also when a Full Burst ends, affecting all allies. It continuously increases Burst Gauge filling speed by 6%. The specific effect depends on the team composition.
If you are the only ally with Burst 1:
Effect 1: Affects the user, cancelling Everyone’s Star.
Effect 2: Affects the user, granting a permanent 40.01% ATK boost (My Own Star).
Effect 3: Affects all allies, reducing the cooldown of Burst Skills by 7.48 seconds.If there are other allies with Burst 1:
Effect 1: Affects the user, cancelling My Own Star.
* Effect 2: Affects the user, re-entering Burst at Stage 1 with Everyone’s Star (a continuous, permanent effect).Additionally, when a fully charged attack hits a target, it deals an extra 120.13% of the user’s final ATK as damage.
No matter how you play AnisTT, she gives all teammates a small boost to their Burst generation with each hit – specifically, 6% of her own Burst generation. While 6% might not seem like much on its own, it adds up quickly when combined with weapons or Nikkes that hit frequently. Weapons with slow or single attacks, like some Sniper Rifles and Rocket Launchers, won’t benefit much, but Shotguns, Machine Guns, Assault Rifles, and Submachine Guns will see a significant increase in how quickly they gain Burst.

Burst gen against a boss performed with a combination of SGs and SMGs.

Burst gen against a boss performed with only Modernia.

Burst gen against a boss performed with only snipers. Barely made a difference.
As a big fan, I’ve been trying to understand how AnisTT works, and it’s a bit like Rapipi (or Red Hood, RapipiRH). Basically, at the start of each round and when Burst time ends, the game checks if Anis should be a regular B1 or a re-enter B1. Here’s the interesting part: if you don’t have another B1 unit on your team, this check is pointless. But if you do, Anis will become a re-enter B1. And this is where it gets cool! If that other B1 unit dies during Burst time, when Burst time ends, Anis automatically becomes your main B1! This is a big deal because Rapipi doesn’t have that 20-second cooldown until she is a B1, so Anis’s interaction can be way more useful in certain situations.
If AnisTT is the only B1 unit in your team, she significantly boosts her own attack power and helps reduce the cooldown times of everyone’s skills. She provides a substantial 7.48-second cooldown reduction consistently, which is a major benefit. Unlike many other cooldown-focused units, AnisTT’s reduction is always active, not just during or after using her Full Burst. This is especially helpful in campaign mode because even if your Full Burst chain is interrupted, AnisTT still provides a cooldown benefit, making her more reliable than other similar units.
If AnisTT isn’t the only B1 unit on your team, she won’t boost her own attack power significantly or reduce enemy cooldowns. Instead, she focuses on re-entering the battle repeatedly. Because she won’t provide cooldown reduction or deal as much damage herself, this strategy is best used only when you specifically need her healing abilities, which we’ll discuss in more detail below.
When AnisTT lands a fully charged attack, she adds extra damage based on her ATK stat. This significantly boosts her damage output while her burst is active.
Skill 2: Stardust
This ability has several effects that activate under specific conditions. When you enter Full Burst while in My Own Star status, all allies receive a 35.01% Attack boost based on your Attack for 10 seconds. Performing a Full Charge attack while in Everyone’s Star status heals all allies for 1.26% of your maximum HP. Entering Full Burst also boosts Projectile Explosion Damage by 92.03% for 10 seconds for yourself and allies with lower Defense than you. Finally, entering Full Burst grants all allies a 34% Attack Damage increase for 10 seconds.
When the team uses Full Burst and AnisTT is the only B1 unit, she provides a helpful attack boost to the team. While this boost isn’t as strong on Attacker and Supporter types because it comes from a Defender, it still increases overall damage. Importantly, this buff combines with all the other benefits AnisTT provides as the only B1 unit, allowing her to deal significant damage.
Okay, so as a big AnisTT fan, I’ve been testing her out, and here’s what I’ve found: if you re-enter her as a B1 unit, her charged attacks actually heal your team! It doesn’t seem like much at first, but because Defenders have so much more health than other characters, that little heal can really add up, especially when Burst Time is active. It’s a surprisingly effective way to keep everyone topped off!
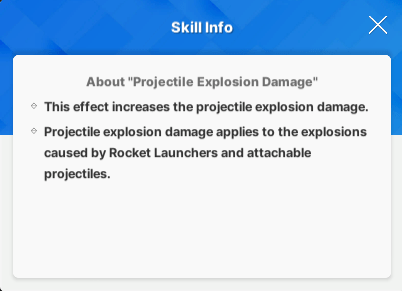
When AnisTT activates Full Burst, she significantly boosts the explosion damage dealt by herself and allies who have lower defense stats. This boost only applies to damage from rockets (her regular attacks), Rapipi’s special projectiles, and the stars Anis fires during Burst. Therefore, AnisTT works best when supporting teammates who heavily rely on rocket attacks and Rapipi to inflict damage.
When AnisTT enters Full Burst, she significantly boosts her team’s damage by 34%. Combined with her other team-wide buffs, this makes her an incredibly strong B1 cooldown unit. AnisTT’s buffs are noticeably more impactful than those of other top-tier B1 units, all while maintaining her own impressive damage output.
Anis: Star total buffs
Attack Damage: 34%
Caster ATK if sole B1: 35.01%
Projectile Explosion Damage: 92.03%
Little Mermaid total buffs
Attack Damage: 14.13%
Damage Taken debuff to enemies: 5.05%
Moran (Treasure) total buffs
Caster ATK: 42.57%
Damage Taken Reduction: 35.14%
Caster DEF: 14.85%
Rapi: Red Hood total buffs
Attack Damage as B1: 8.02%
Caster ATK as a B1: 18.01%
Liter total buffs
Increases Attack by 88% for 5 seconds when fully stacked, and by 66% otherwise. Also boosts Critical Damage by 12.46% for 5 seconds at 2 stacks, and Max Ammo by 45.17% for 5 seconds consistently.
These buffs seem quite high numerally compared to the others on the list.
Although these improvements seem great in theory, their shorter length makes them less useful over time, especially when compared to other benefits, and even more so when considering AnisTT’s effects.
AnisTT significantly boosts a team’s damage output, both through her own attacks and by enhancing the damage of her teammates. This allows teams to overcome previously insurmountable damage checks, letting them advance further in the campaign until they reach a new challenge.
Burst: Star Anis
Cooldown: 20s
Okay, so this skill creates these shooting stars around my character, Anis, that automatically attack enemies. They do about 40% of my attack damage per hit and fire pretty quickly, every 0.25 seconds, lasting for 10 seconds. While it’s active, my charge time is fixed at 0.7 seconds, my explosions get 100% bigger, and my defense goes up by 55% – all for those 10 seconds.
If I’m in ‘My Own Star’ mode, it also boosts my attack damage by 35.2% for 10 seconds. And when I’m in ‘Everyone’s Star’ mode, it gives all my allies a 15% HP boost based on my max HP, also lasting 10 seconds. It’s a pretty solid skill for both damage and support, honestly!
When AnisTT activates her Burst ability, she doesn’t switch weapons. Instead, she gains an extra weapon that attacks automatically alongside her main one. These ‘Shooting Stars’ are explosive projectiles that fire on their own, dealing significant damage – a large portion of her total damage – every 0.25 seconds. During her Burst, she launches a total of 40 of these stars.
These attacks count as regular attacks, so damage to an enemy’s Core and Parts will be affected by Core Damage and Parts Damage modifiers. Additionally, because they are considered exploding projectiles, they benefit from the Projectile Explosion buff gained from Skill 2.
These stars attack automatically, which can sometimes cause problems. They might accidentally destroy important parts of enemies, like the core of Chatterbox or the Glass Slipper of a Mirror Container. Even with the ‘Full Cover’ option enabled, they’ll keep firing on their own. Despite this, the significant increase in damage output usually makes it worthwhile.
In addition to improvements to her secondary weapon, AnisTT’s primary weapon is also enhanced. Its explosion radius is larger, and the charge time is set to 0.7 seconds. This allows her to fire 14 shots with her main weapon during a Full Burst, without any interruptions to reload. When playing AnisTT, aiming for this maximum ammo count is a good strategy, assuming you aren’t using any reload speed boosts.
With a faster recharge rate, AnisTT can use her special ability (S1) more often and provide significantly more healing with her S2, especially if she’s a unit that can re-enter battle. Because she’ll be able to use her ultimate ability (Full Burst) constantly, and her S1 helps build up that ultimate faster, she’ll consistently deal high damage to enemies.
When AnisTT uses her Burst, she significantly boosts her Defense by 55.01%. This might not seem like much, but it helps her explosions hit more enemies, particularly when combined with the Crown passive skill.
How Anis: Star’s DEF buff allows the Projectile Explosion buff to affect any unit
Typically, characters like Cinderella, who also function as Defenders, have a hard time benefiting from AnisTT’s Projectile Explosion Damage boost. This is made even more apparent with Crown, which increases Defense for a character who doesn’t focus on powerful, quick attacks. However, because AnisTT significantly boosts her own Defense by 55%, it would be very unusual for a Cinderella also benefiting from Crown’s Defense buff not to receive the Projectile Explosion buff. The only way this would likely happen is in a specific scenario, like Cinderella and Crown being fully upgraded while AnisTT remains at her initial level.
If AnisTT is the only B1 character on the team, she increases her own Attack Damage by 35.2%. This is another way AnisTT boosts her damage output, significantly improving her DPS.
I’m testing my AnisTT against the training room boss, and she’s doing surprisingly well despite having weak elemental damage stats. She can already defeat Ice Rose, and with better stats, she might even be able to beat Cinderella – especially considering Cinderella is a lower-tier unit. It’s honestly amazing how well she’s performing.
If AnisTT re-enters as a B1 unit, she provides a significant health boost to the entire team. This makes her healing more effective while she’s in re-enter mode, and it’s particularly helpful for characters whose damage output relies on their maximum health, like Cinderella or Ice Rose.
Campaign
For most campaigns, Anis will be the best choice for the B1 slot. While Moran (Treasure) can be useful for their taunt ability, Anis offers a lot in one unit: high personal damage, powerful buffs that combine well with the B2 unit’s buffs, and strong burst and cooldown capabilities. She’s a versatile asset that can contribute to the team in many ways, all while taking up only one slot.
AnisTT is a very strong unit for the first battle slot (B1). While other B1 units are still usable, if you have AnisTT, there are few good reasons to choose someone else, especially if you’re trying to maximize your progress in campaign mode. AnisTT’s ability to boost stats and deal damage helps players counteract stat reduction effects and achieve high damage output.
While AnisTT can function as a second B1 unit if paired with another, she doesn’t reduce cooldowns when used this way – instead, she provides a heal. This means you’ll still need a dedicated B1 unit to handle cooldowns. Although her team buffs remain strong, losing only the caster attack boost while keeping the significant attack and explosion damage buffs, her own damage output is greatly reduced.
Although her abilities function similarly to a standard B1 unit in terms of damage output, she misses out on significant attack boosts. Specifically, she loses a 40% attack buff from her Skill 1 and a 35% attack damage buff from her Burst, both of which she normally applies to herself as a solo B1. This causes her individual damage to fall by more than 50% in most situations, which is a substantial drawback.
Anis is incredibly powerful, dealing massive damage herself and significantly boosting the damage output of her entire team for the duration of a battle. She provides a better damage buff to any team composition than any other B1 unit could.
AnisTT has one weakness that might make you think twice about using her on some campaign maps: the unpredictable way her Burst weapon’s Stars fire. While these Stars add a lot to her damage output, you can’t control where they go, even if you try to keep her safe behind cover. They’ll continue to fire randomly.
The best way to avoid triggering an attack is to simply not use her special ability (Burst) while she’s present. However, if you’ve already brought her along, avoiding it can be difficult unless the situation is truly critical. Because the direction of her ‘Stars’ is unpredictable, using her Burst could accidentally activate dangerous boss abilities or enemy attacks, potentially causing trouble for your team if you can’t quickly defeat the enemies involved.
Currently, the Volleyball is the only common enemy with a special ability. If it survives an attack, it starts rapidly firing powerful bullets at its target while becoming much harder to damage. If Anis, a character in the game, has low stats or isn’t properly equipped, facing the Volleyball on certain maps can cause it to activate this ability too often, leading to excessive damage or even team wipes.
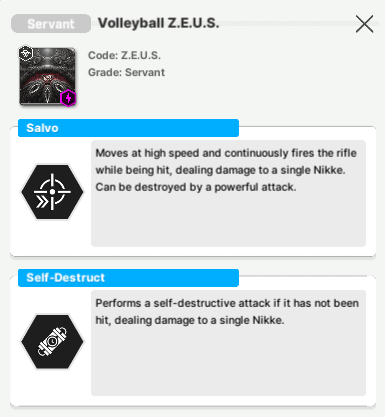
Yet another OP unit that can be stopped in their tracks by the ball.
I’m going to break down which bosses change their attacks when you damage specific parts of them. Basically, I’ll explain how breaking certain body parts affects their behavior in a fight.
Arena
AnisTT excels in player-versus-player (PvP) combat. Her rocket launcher provides a powerful boost to allies, letting strong units quickly eliminate opponents before they can be defeated. While other characters like Trina can boost Scarlet’s damage, significant damage boosts are rare, making AnisTT’s Burst ability particularly valuable in the Arena.
AnisTT can inflict a lot of damage by herself thanks to her Burst weapon and increased attack speed while Burst is active. When paired with Attackers, battles will become even faster due to the incredibly high damage output.
Okay, so AnisTT’s first skill is seriously amazing for building up Burst. Basically, every time anyone on my team deals damage, they get a little extra Burst generation, and it’s a solid 6% boost based on AnisTT’s base stats. That means weapons and abilities that hit multiple times quickly are way more effective with her in the team. It really rewards fast-hitting builds, which is awesome!
Weapons like Clip SGs, Liberalio, and Snow White’s Heavy Arms, and Rifle Launchers with large area-of-effect attacks (like Vesti with Tactical Upgrade), can hit multiple enemies at once. This is especially helpful because AnisTT’s skill increases how quickly you gain Burst damage. Some players think using two SMGs could also be a good strategy in player-versus-player combat.
AnisTT isn’t very strong defensively as a Defender in Arena, but her high damage output and the buffs she gives to teammates more than compensate for this. Her ability to constantly boost burst damage generation opens up new, quicker strategies, particularly with shotguns, that weren’t possible before. This makes her a valuable asset in any PvP situation.
Anomaly Interception | Union Raid | Solo Raid
Okay, as a fan, let me tell you, AnisTT is a total game-changer! She’s just so much better than other units for stage 1 cooldown battles, especially when fighting bosses. Her buffs are way stronger, and she does a ton of damage herself. Honestly, in almost every boss fight, she’s the best choice for B1 – she’s just that powerful!
For Solo Raids, always use AnisTT with your most powerful units to maximize damage. She excels against Electric-weak raids, delivering significant personal damage and providing a large damage boost to the team.
When tackling Union Raids, it’s most effective to send AnisTT to fight the boss that’s weak to Electric attacks. If your union hasn’t assigned you to focus on Electric weaknesses, then send her to fight with your team’s strongest element instead.
She’ll be a top choice for battling bosses, but remember a few things about specific fights, particularly how her special attack works.
Okay, so I’ve been running Anomaly Intercept, and Kraken really hits AnisTT hard. She’s super weak to its Iron attacks, and in AI, bosses already do a ton of damage – like 3 to 5 times normal – if they hit an elemental weakness. But the thing about Kraken is a lot of its attacks are just these huge, single hits. That’s actually good news, because it means team shields work really well against it. If you bring Tia or Crown, AnisTT can actually survive Kraken in AI without needing to constantly use her cover, which is a huge help!
In the second stage, protect both the creature’s front and back tentacles to prevent it from unexpectedly firing a laser at AnisTT. When you see its slow-moving attacks heading towards AnisTT, make sure AnisTT finds cover.
It’s really important to keep AnisTT safe from Kraken’s attacks. As soon as you see any incoming projectiles, get her to take cover immediately.
The Chatterbox, a special enemy, has a powerful response when its head is destroyed. It leaps backward a significant distance and slams down, dealing massive damage to the entire team while ignoring any cover or shields.
Anis’ Stars are powerful enough to destroy Chatterbox, even if you don’t intend to. You’ll need to see if the damage from using Anis’ abilities is enough to either unlock a higher reward level on Chatterbox, or completely defeat it. Even if you fail the attempt, if Anis’ buffs and damage helped you reach a new reward tier, it’s still beneficial to use her instead of another stage 1 character.
Modernia, when intercepting enemies, responds with a powerful missile attack even if her launchers are damaged. She flies to a safe distance, launches a barrage of high-damage missiles that can be shot down, and teleports around to avoid being hit. Although this attack deals significant damage, it’s less sudden and overwhelming than Chatterbox’s attack, making it easier to handle.
Using AnisTT can make destroying missiles much easier, thanks to her strong buffs like Stars. Although triggering Modernia’s counterattack can be frustrating, it’s still a good idea to bring AnisTT into the fight.
AnisTT is excellent for dealing damage to Mirror Containers (MCs). But if your team is significantly underpowered, and AnisTT can’t reliably destroy the Glass Slippers, her burst damage will actually make the MC fight much harder. You’ll be stuck dealing with the MC’s maximum defense the entire time.
Okay, so I’ve been testing AnisTT, and while she can put out some serious damage and help take down MC, especially if she’s got a type advantage, it’s not always easy. MC is just really bulky. Honestly, if you’re running AnisTT against MC, I strongly recommend bringing a character who deals True Damage, like Ein. He’ll really shine with the buffs AnisTT provides and cut right through MC’s massive defense stat. It makes a huge difference!
This information mainly concerns the Mirror Container battle within Campaign mode. Unlike the AI version, which becomes simpler and can even be soloed by AnisTT’s Stars for easy automation, the Campaign version’s difficulty is heavily influenced by how well you’re doing overall – a clean fight is vastly different from one where you’re significantly behind.
Okay, so the Crystal Armor is kinda like fighting MC – if you don’t take out its armor pieces, it gets super hard to damage. It only has two parts you can break, but here’s the kicker: those parts actually heal over time! And honestly, the defense boost you’re looking at if you don’t break them is way higher than with MC. It’s a tough fight, you gotta focus on those crystal bits!
Like MC, AnisTT can accidentally target the Crystal Armor’s protective parts, forcing you to fight through its strong defense for the entire battle. Although it’s weak to electricity, if you can’t break those parts with AnisTT, you’ll eventually need to use attacks that ignore defense – True Damage – to defeat it.
AnisTT’s star attacks continue even while she’s teleporting or moving away, which can cause a problem: they might accidentally hit and break Interruption Rings while targeting an enemy who’s already gone. These stars function like regular attacks, triggering a quick-time event (QTE). If the stars hit the grey rings, the QTE fails, and in cooperative play, this always leads to a game over.
Because AnisTT will be the primary unit used in co-op challenges for a while, players will need to learn how to deal with it. A key tip is to avoid using AnisTT’s Burst ability right before a Quick Time Event (QTE) begins. During the Burst, the stars will continue firing even if you’re in cover, so the best way to keep them from potentially hitting the grey rings is to make sure the Burst isn’t active when the QTE starts.
Since AnisTT relies on Real Life, she probably won’t be able to assist with cooperative Quick Time Events that feature grey circles. This means Crown and other supporting characters like Privaty will have to handle the red circles by themselves, increasing their workload.
If the cooperative unit is vulnerable to Fire or Iron, and Rapi can’t handle grey circles in the quick-time event (QTE), it’s a good idea to switch away from AnisTT. This simplifies the QTE – especially if it includes grey circles – leaving only two units to manage it.
Strengths
- The Crown of B1; a do-everything kind of unit with no major downsides, only nitpicks.
- Huge personal DPS, regardless of element, and with no conditions.
- The highest buff power among all B1 Cooldown units.
- High, unconditional cooldown.
- Burst generation bonus is incredible for fast firing weapons.
- Huge Explosion Damage buff is appreciated by all RLs, Rapi: Red Hood and herself, but allies don’t necessarily need to be RL to be buffed excellently by Anis: Star.
- Can be a re-enter when she’s not needed to deal DPS and there is another cooldown in play by sending her with a second, regular B1. This will definitely matter more as time progresses.
- Amazing body.
Weaknesses
- Her weapon’s stars can inadvertently trigger undesirable effects depending on the enemy. While her personal DPS will almost always make up for it, it is worth bringing up.
Rating
| Category | Rating |
|---|---|
| Overall | SSS |
| Story | SSS |
| Bosses | SSS |
| Arena | SSS |
Recommended Cubes
Like many high-damage units, both Resilience and Bastion are good support cubes for AnisTT. However, Resilience is generally better because AnisTT reloads slowly and starts with a small magazine, and she doesn’t have any abilities to help with these weaknesses.
If she’s used with fast reload setups like Crown and Privaty or Maids, giving her the Destruction Cube can be effective against enemies with detachable parts. It significantly boosts both her regular attacks and her Star skill.
Doll Priority
Because she’s useful in almost all situations, she’s currently the most important character to bring to content that only requires one team. It’s likely she’ll remain the top choice unless specific conditions change.
She’s incredibly strong, deals a lot of damage on her own, and offers great team support with her abilities. Because she provides so much value in one package, she’s likely to remain a popular and effective character for a long time.
Expected Skill Priority
| Nikke | Budget Skill Investments | Recommended Skill Investments | Skill Priority | Notes | Investment Priority |
|---|---|---|---|---|---|
| Anis: Star | Skill 1: 7 Skill 2: 7 Burst: 7 |
Skill 1: 10 Skill 2: 10 Burst: 10 |
S1 > S2 | Skill 1 improves the cooldown, attack activation on her weapon, the burst generation and the ATK buff when she is the solo B1. Even though all of her skills are important, because the cooldown reduction is on S1, it has slightly more priority.
Skill 2 is where her team buff comes from, and gives her even more personal damage if she is the sole B1. Since this big buff is what sets her apart from other cooldown units, it’s still very important to level Burst boosts her DPS to be some of the highest in the game. For a B1 unit to have this much DPS is unreal, and that’s before considering everything else she does from her other skills. |
Highest |
Overload Gear Priority
Gear Priority = Head > Gloves > Chest > Boots
| Attribute (Sub-Stat) | Priority | Recommended | Notes |
|---|---|---|---|
| Increase Element Damage Dealt | ★★★★★ | 4x | Wanted for Union Raids and Solo Raid content. |
| Increase Hit Rate | ☆☆☆☆☆ | 0x | — |
| Increase Max Ammunition Capacity | ★★★★☆ | 2 – 4x | She optimally wants to hit around 14+ ammo, so that she can fire off a full magazine of her basic attacks mid-burst, which is achieavable with at least 2 ammo lines. |
| Increase ATK | ★★★★☆ | 2 – 4x | This boosts her damage substantially. However, as a defender, her base ATK is fairly low, resulting in a lower comparative boost from ATK OLs compared to Supporters and Attackers.
However, since she doesn’t have HP -> ATK scaling like Cinderella or Maiden: Ice Rose, ATK is still more effective on Anis: Star compared to them. |
| Increase Charge Damage | ☆☆☆☆☆ | 0x | — |
| Increase Charge Speed | ☆☆☆☆☆ | 0x | Due to her Burst providing her with fixed charge speed, charge speed on Anis: Star is not very effective for her. |
| Increase Critical Rate | ★★☆☆☆ | 1 – 2x | Since ATK OLs aren’t as efficient on her compared to the other Unit types, if you happen to get either critical line, it may not necessarily be worth trying to reroll it for more ATK. |
| Increase Critical Damage | ★★☆☆☆ | 1 – 2x | Ditto. |
| Increase DEF | ☆☆☆☆☆ | 0x | — |
Read More
- First Look at Bad Bunny’s Exclusive Zara x Benito Antonio Collection
- Total Football free codes and how to redeem them (March 2026)
- PUBG Mobile x Harley-Davidson Partnership to introduce new Motor Cruise event with rewards and Skins
- Clash of Clans May 2026: List of Weekly Events, Challenges, and Rewards
- Farming Simulator 26 arrives May 19, 2026 with immersive farming and new challenges on mobile and Switch
- Honor of Kings x Attack on Titan Collab Skins: All Skins, Price, and Availability
- Honor of Kings April 2026 Free Skins Event: How to Get Legend and Rare Skins for Free
- ALLfiring Companion Tier List
- All Mobile Games (Android and iOS) releasing in May 2026
- Clash of Clans “Clash vs Skeleton” Event for May 2026: Details, How to Progress, Rewards and more
2026-05-02 02:14