
Nita is indeed a pioneer in several aspects for Snowbreak, yet not entirely so. She’s the inaugural free SSR DPS character, however, she isn’t the first free SSR operative to be introduced. Similarly, she’s the initial melee operative, but that title could also be given to Haru – Absconditus with his Bluetooth sword slashes. In combat, her playstyle offers a distinctive, engaging experience, yet it simultaneously exposes some recurring characteristics of Seasun, which can be either appealing or problematic.
Jump to cheat sheet
Abilities
Standard Skill
Kicking off with Nita’s regular move sets the stage for an exciting display of swift fist attacks. When Nita leaps towards her target, she initiates with a single punch followed by five rapid ones, inflicting damage proportional to her maximum health. To perform this sequence, simply tap your standard skill button repeatedly, ensuring optimal timing – landing the punch at the perfect moment will boost your damage, but striking too soon or too late will reduce it and accumulate Cinder Chimes. Accumulating an excessive amount of these chimes will cause an early skill termination and inflict damage on you. This is something to avoid as it’s not enjoyable. It’s crucial to remember that after the five punches, a final powerful blow (the “Searing Smash”) is timed, which deals much higher damage and resets the cooldown of Nita’s signature weapon when equipped.
Using neuronics, the Searing Smash inflicts more damage and shortens Nita’s ult cooldown when she equips a Thermal weapon. This is beneficial for two main reasons. However, the second neuronic might not be as helpful. It increases the number of Cinder Chimes you can gather before self-destructing and decreases the cooldown of your basic skill when firing at enemies. The increased collection of Cinder Chimes may not be advantageous because optimal gameplay involves timing, and the reduction in the cooldown of your basic skill doesn’t offer significant benefits since it already resets its own cooldown. It can be a bit puzzling. Nevertheless, you should still unlock it as it enhances the HP ratios of your skill.
As a gamer, I’ve found myself stuck in a predicament when battling anything that isn’t a punching bag. After my initial jump-attack, I find myself rooted to the spot, which makes hitting enemies at a distance a bit clumsy, especially since I aim to complete the entire attack sequence for the skill cooldown reset. However, there’s a silver lining: while the skill is active, I can dodge to dash forward slightly, simultaneously resetting the skill timing bar. It’s a relief, but it’s also not as effective as I’d prefer it to be.
Support Skill
This DPS filler skill is typically run-of-the-mill, but offers a bit more excitement due to its engaging counterattack feature when synchronized with an enemy’s attack. However, given that Nita remains crucial on the battlefield, you may not find yourself utilizing this skill extensively.
Ultimate Skill
In simpler terms, when Nita uses her ultimate ability, she doesn’t require U-Energy, instead, she delivers a powerful blow to herself, taking 99% of her current health, and simultaneously harming all nearby enemies by the same amount. With the aid of neuronics, this attack causes even more damage and fortunately provides a shield, protecting most of the Health Points she loses. This makes it feasible for Nita to use this ability effectively, sparing her from the frequent sacrifices that Rackam typically undergoes.
Deiwos Passive
You might already know that synchronizing your punches with Nita’s standard skill is crucial. However, it turns out that this timing is even more significant than you may realize. That’s because Nita’s Deiwos passive directly benefits when you hit perfect timings, especially at key breakpoints.
The first noteworthy breakpoint is at the five-perfect-hit milestone, which boosts your damage output; the subsequent two at 10 and 15 offer damage reduction and healing, both of which are beneficial, of course. Additionally, building up Alignment Index enhances Nita’s healing capabilities, a feature that surprisingly proves useful because Nita’s ultimate ability deals damage based on the health consumed, which in turn depends on her current (not maximum) HP. This means that the more health you restore, the more you can consume during your next ultimate, thereby increasing the damage output.
Assessment
When Nita engages in work, the gaming encounter becomes seamless, not to mention entertaining. Time your punches wisely to inflict harm, exhaust your HP bar for a massive explosion, and repeat this process for however many rounds in the ring are necessary until your opponent is knocked out.
There are a few difficulties that might arise as you strive to become The Greatest. For instance, her standard skill is impressive in many ways, but it sometimes falls short of expectations. During its activation, your resistance to crowd control effects seems to increase, but you can still be disrupted by being staggered or knocked out of position, leaving you helpless until the cooldown ends. Moreover, the skill’s duration and effectiveness are tied to a timer; once the indicator reaches the end, the skill expires without giving you a chance to follow up with supportive skills if you had planned to do so after gap-closing with the initial cast.
As for mobility, Nita’s kit seems to lack it significantly, especially when facing swift enemies or slippery bosses like Pi or Shadow Predator. This can make the battle experience quite frustrating as it becomes challenging to keep up with them.
Glancing at her weaponry, supplies, and enhanced Auctus Drives, it’s disappointing to note that despite strong ideas, there are confounding issues in the execution itself. Let’s crank up the Rocky-style training montage music!
Weapons
From a gamer’s perspective, there’s no doubt in my mind that Nita’s signature weapon, Timeless Rhythm, is the go-to choice. It stands out not just for its own strengths but also because other options seem to fall short. For instance, Siris – Ksana’s signature weapon, Crowned Flail, unfortunately doesn’t perform as expected. Its skills, apart from the HP boost, don’t seem to function correctly due to Nita’s standard skill duration not being considered a continuous cast. This misfortune results in Crowned Flail performing worse than Siris’ alternative option, Scarabaei, which is quite rare for a non-signature weapon.
Essentially, neither choice offered is particularly effective as weapons, but the fact that you receive Timeless Rhythm for free makes it an excellent choice. In truth, considering its benefits, there’s little reason to consider anything else, so comparing them seems unnecessary.
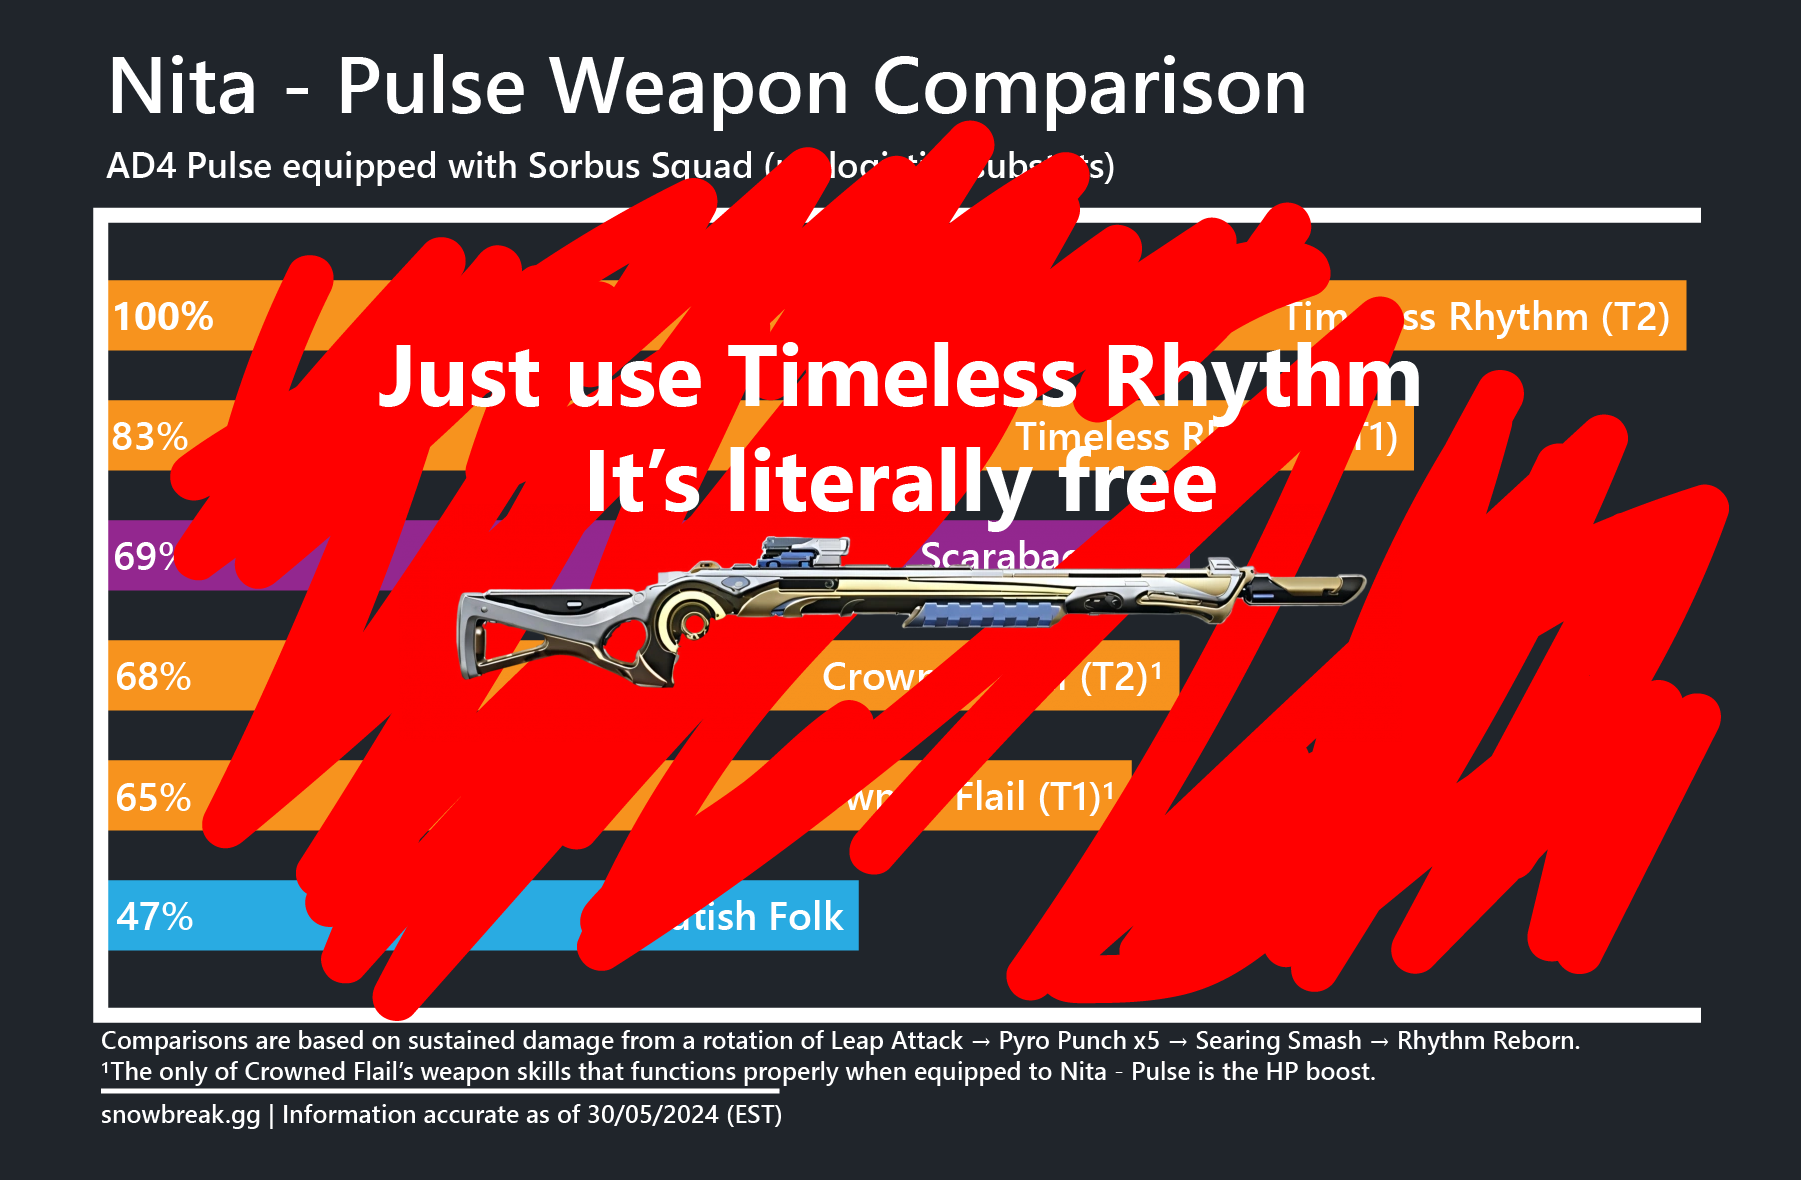
Timeless Rhythm inherently offers a decent assortment of bonuses – an enhanced HP level and, when your maximum HP surpasses 40,000, it additionally amplifies skill damage and applies a percentage reduction in damage taken. It’s important to note that it refers to maximum HP, not your present health. This could be misleading if you were to lose these benefits upon using an ultimate attack (though, given the unpredictability of Seasun, who knows?). In isolation, this places it on par with other high-tier gacha weapons. But that’s just the beginning. There’s more to it…
Previously discussed, when you use Auctus Drive, it resets the cooldown for Nita’s regular abilities immediately after she delivers the final blow with Searing Smash. This feature is incredibly beneficial, and it offers even more advantages; it prevents the generation of Cinder Chime stacks when timed perfectly, allowing you to fight an entire battle without a single stack appearing. The additional features this weapon provides for Nita make it seem like an undiscovered bonus. In other words, Auctus Drive is a hidden extra perk.
This weapon is excellent except for one issue – it can only be effectively used with Nita. Most of its advantages are tied to Nita specifically, which makes it inaccessible to other characters like Siris – Ksana. It’s unfortunate because this weapon would significantly enhance Siris – Ksan’s abilities, even surpassing her own primary weapon by a noticeable amount.
Siris has struggled significantly in the meta since her debut, making this potential update a potentially beneficial boost without overpowering her. Frankly, giving Siris a new tool can’t hurt, and I’ve never been fond of Ksana as an operative. I believe that Siris was unfairly treated, and it’s disappointing when her signature weapon doesn’t synergize with Nita due to technical reasons. However, there seems to be no justification for the reverse situation, as Nita’s abilities don’t work with Siris, other than Seasun’s decision to design them that way. It’s aggravating to observe, but if the consistent rollout of character-restricted logistics packs hasn’t already made it clear, it appears that Seasun remains as rigid as ever when it comes to player interaction within the game, only accepting playstyles that Seasun approves. For a glimpse at what could have been, refer to the additional material provided.
Auctus Drives
Unlike most operatives, Nita operates differently, without manifestation levels. Instead, she possesses four Auctus Drives, each serving a purpose similar to those levels. It’s unclear why this is the case as these drives don’t seem to clarify the distinction or explain her preference for using them. However, since they are available for free, there’s little reason not to acquire them. Let’s review their functions anyways.
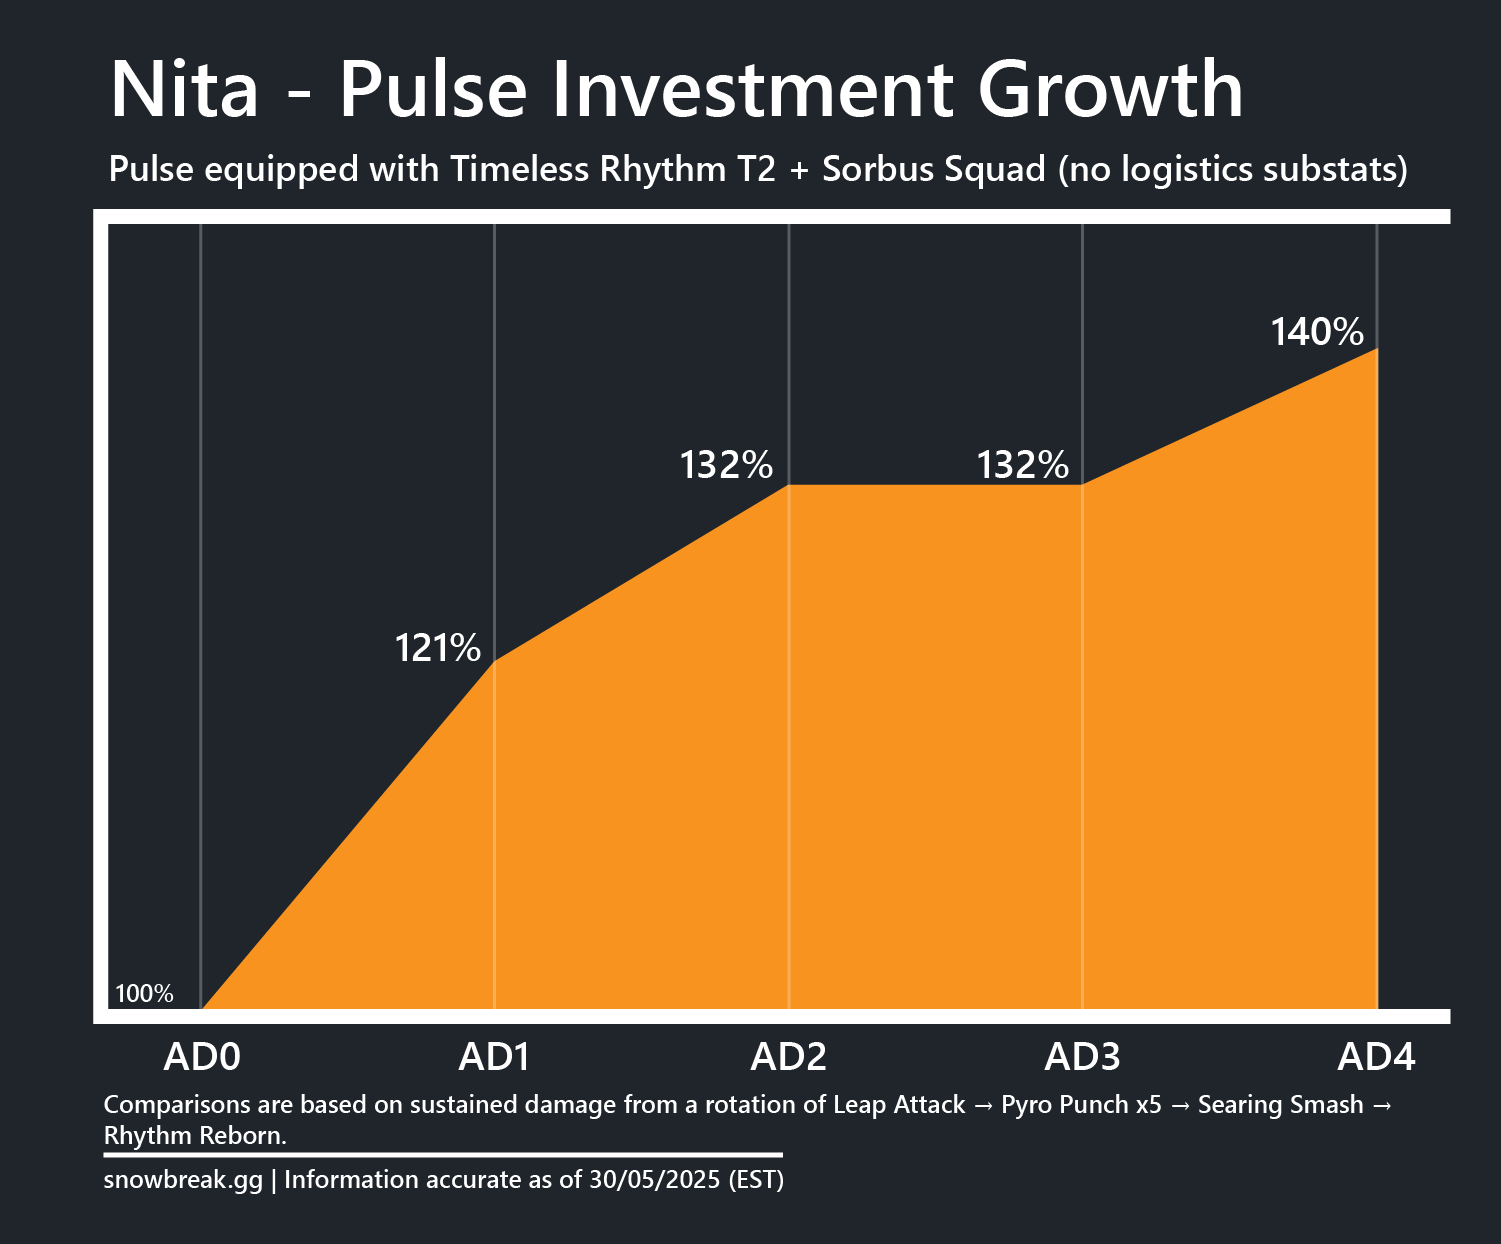
Auctus Drive 1: The potency of Searing Smash is amplified depending on the number of Cinder Chimes you possess, reaching a maximum boost of 150% when you have none (which can occur due to Timeless Rhythm). Unlike how it’s described in-game, this damage increase doesn’t manifest as a percentage buff to damage or damage taken, or any buff for that matter. Instead, it raises the health scaling of the attack from its initial ratio of 85%, all the way up to 150%. However, the mechanics behind this enhancement might seem a bit confusing, but what matters is that it nearly doubles the impact of that strike and boosts her overall damage output per rotation by approximately 20%.
I think I’m going to call my therapist after I finish writing this article.
Auctus Drive 2: Activating this ability enables Nita to recuperate up to 4% of her maximum Health each time she throws a punch using her standard skill, as long as she equips a Thermal weapon. At first glance, this may not seem beneficial because it doesn’t enhance damage output. However, remember that Nita’s ultimate ability’s damage is dependent on the health she depletes. If you have no health left to expend, her ultimate cannot inflict damage. Therefore, healing back up after using your ultimate becomes crucial for dealing subsequent damage with repeated ultimate casts. The amount healed is contingent upon the timing of your punch, with a maximum of 4% of Nita’s max HP when timed perfectly. To put it simply, 4 is greater than 3, which will be relevant later on.
With this update, fewer Cinder Chimes are earned when timing isn’t perfect. However, it’s essential to continue achieving perfect timings due to Auctus Drive 1. Unfortunately, this feature may not be very practical in use as intended. It’s important to note that the reduction in Cinder Chime gain is set to 3, not a subtraction of 3. Many thanks once again, Seasun, for your exceptional skill text translation. Regretfully, you must acquire this upgrade because Auctus Drive following this one is beneficial. Apologies.
Auctus Drive 4: Keep in mind the healing ability from Auctus Drive 2? With this upgrade, Nita gains a temporary boost to her skill damage whenever her health fluctuates by more than 3% of her maximum health capacity. It’s important to note that her healing from AD2 can reach up to 4% of her max HP, which is greater than 3%. This implies that every successful hit you land gives you a (regrettably, non-stacking) skill damage boost with a high frequency of occurrence. Be aware that if your health is almost at full, healing for less than 3% of Nita’s max HP in practice won’t activate the buff even though it would theoretically do so.
In simpler terms, using Nita’s ultimate move reduces her health significantly, triggering a buff. However, you should consider being near enemies first so that her ultimate is within range. Unfortunately, Nita has limited mobility, so you might need to use a standard skill to get closer, which could mean going through a sequence without the buff or ending it early to use the ultimate (and then waiting for cooldowns). Another option is to throw the ultimate before engaging in combat, but that’s not ideal. Lastly, enemies can interrupt Nita while she’s jumping with a support skill, resetting her standard skill cooldown. While this could potentially work, it wastes the support skill. The best solution might be to start with Nita’s standard skill initially, missing out on the buff but keeping your gameplay flow smooth. There isn’t a perfect solution to this problem, but I suggest this approach.
Logistics
As a member of Sorbus Squad, I’ve been relying on Nita’s Logistics Set quite a bit in our matches. This bad boy has two handy abilities that have proven to be game-changers for me as Nita.
First off, whenever my health drops, it boosts the damage of my ultimate. Now, you might think that’s counterintuitive since Nita’s ult consumes HP to activate. But here’s the twist – the buff kicks in before the damage is calculated, so even though it lasts only a second, it definitely makes a difference.
Secondly, every time I get healed, I receive a brief boost to my standard skill damage. It’s like Auctus Drive 2 coming back to save me yet again. Isn’t it funny how that works? Unlike the Auctus Drive 4 buff, this one activates even if I’m already at full health. So, even a tiny bit of healing is enough to trigger it, making it a reliable boost in any situation.
I don’t think you need me to tell you to use this logistics set, but just in case: yes, you should.
Regarding substats, it’s clear that Health Points (HP) should be the initial priority since all of Nita’s damage is scaled based on it. In other words, having more HP will lead to dealing more damage, and it doesn’t get much simpler than that!
Regarding the second stat you’re curious about, the Alignment Index surprisingly performs quite well in the case of Nita. This is partly due to a limited number of options since Nita doesn’t shoot, doesn’t have S- or U-Energy issues, and her Defense (HP) is primarily useful because Nita’s damage scales off of it. As for Attack, it turns out not to be particularly beneficial as all of Nita’s damage originates from her abilities. Additionally, the Alignment Index supports Nita’s ultimate ability, a topic I elaborated on when discussing her Deiwos Passive. If you want to revisit that explanation, click here.
In your gameplay as Nita, you might have observed that her ultimate’s cool-down doesn’t synchronize precisely with her regular ability duration. This can lead to using another regular ability before the ultimate is ready or having a brief pause while waiting for the ultimate cooldown to reset. The question then arises: Could Nita’s ultimate cooldown be shortened enough so that it matches her standard ability?
It appears that reaching around 50 skill haste allows Nita’s ultimate cooldown to decrease enough for the sequence of standard skill -> ultimate -> standard skill to occur. However, achieving this requires three skill haste enchantments, leaving no room for Alignment Index to boost Nita’s healing and ult damage. This means that you’ll use your ult more frequently, but they’ll be weaker, which raises some doubts, especially since Nita deals more damage with her standard skill. Instead, you could choose to perform two standard skills before unleashing your ult. While the skill haste build gives a slight increase in DPS due to skipping animation frames during 1:1 cycling between standard skill and ultimate casts, I still suggest most players stick with Alignment Index for better healing and damage output.
For additional detailed weapon and equipment setup comparisons, along with a tool to assist in fine-tuning your gear, check out the supplementary resources provided.
Team Building
In simpler terms, when using Nita, it’s crucial to coordinate her attacks with her support skills. If you don’t, her attack animation might interfere with her support skills, causing her punches to be prematurely ended. This can lead to less effective use of her abilities. Consequently, Nita performs best with supports who can provide assistance without getting too close or needing to physically interact with her. In a way, this makes Nita’s ideal supports resemble the operative, Nerida – Styx Envoy, who also debuted in the same update.
To begin, play Enya’s track ‘Exuvia’. Initially, utilize her support ability as soon as possible, then recast it following Nita’s initial jump with her basic skill to reposition it where you now stand. Although it may feel a bit clumsy, this tactic is effective. Keep in mind that Nita doesn’t attack, so don’t anticipate any assaults from Enya’s support skill pod unless she’s at level 3 or higher. With this in mind, Marian – Riptide gets an opportunity to outmaneuver her main competitor as her passive damage enhancements evade Nita’s interferences while Riptide is punching. Moreover, each of Nita’s basic skill punches serves as a cast, thereby accelerating Riptide’s ammunition production. You can even replace Nita with Riptide to execute her sub-DPS rotation between her basic skill and the rest of her ultimate cooldown if you’re not employing the skill haste build.
Generally speaking, the standard support characters like Acacia – Kaguya and Mauxir – Shadow Ka continue to perform effectively, offering their usual helpful abilities. Shadow Ka, in particular, can compensate for Nita’s limited mobility issues quite well. However, it’s important to note that unlike ballistic DPS operatives, you won’t gain any additional benefits. Furthermore, enemy invincibility remains a challenge. Tess – The Magician is another option due to her ability to deliver significant one-time damage buffs for Nita, especially since she has easy access to her ultimate. That being said, Eatchel – The Cub, serving as an attack buffer, doesn’t offer any offensive boosts for Nita (due to HP scaling). As such, he is primarily useful for his healing capabilities and the stun effect.
For budget-friendly choices: Acacia – Redacted’s long-range slow provides an opportunity to inflict pain before opponents escape, while Cherno – Those Two can transport Nita directly into the fray. Chenxing – The Observer enhances her skill damage buffs by boosting the healing she offers, which in turn boosts Nita’s DPS due to how her ultimate ability functions. Lastly, Mauxir – Meow’s support skill allows Nita to deal double the damage with each punch, thanks to striking the enemy twice with each fist.
When assembling a team for Nita, remember that her abilities are based on Health Points (HP). This implies that supportive weapons and enhancements that boost Attack won’t be effective at all. Instead, focus on strategies that increase damage directly or offer alternative offensive advantages.
Should You Pull?
Indeed, not at all. It’s quite remarkable if one could utilize gacha pulls for equipping Nita, as all necessary items for her setup are available for free resources instead.
Without making light of it – although Nita herself can be acquired directly, her signature weapon, Auctus Drives, and a logistics squad set need to be earned by playing the game mode “Nita’s Invitation.” This includes customizing their HP and AI settings. It’s like a game where you gather currency that can be used to enhance your resource collection capabilities. After completing one round, you can trade in your earnings to advance through the rewards track. While it might not be particularly exciting, it performs decently well as a Snowbreak minigame. It offers an “auto” mode, but due to the numerous pop-ups and prompts requiring manual interaction, this feature often negates its purpose. I’d give it an A for effort, I suppose.
If you’re able, consider playing the game simultaneously on another screen or device alongside your YouTube viewing experience. The game will likely prompt you to handle various pop-ups about every twenty seconds, but there are tactics you can employ to expedite this process. Alternatively, you might find it easier to simply let your mind wander and do a few additional playthroughs; I managed to complete the entire game in approximately two hours and a bit, all while catching up on my Perun videos. Compared to other grinding tasks, this one could certainly be more demanding, but it’s not the worst.
With Nita’s full potential merely requiring a Netflix and chill session, it might be challenging not to suggest giving her a try unless you genuinely dislike her gameplay style. She may not challenge the top Neural Sim players immediately, but her user-friendly nature makes her an excellent choice for beginners who can handle her effectively, allowing them to set a respectable score.
In essence, Nita stands out as one of Seasun’s top-tier operatives in quite some time. Her unique abilities make her effective, yet she doesn’t disrupt the overall balance of the game excessively. With her ability to deal Nitillion damage almost instantaneously, she offers a refreshing perspective. She rekindles my faith that Seasun can continue providing enjoyable and engaging gameplay experiences, even following several releases in the game’s recent past that were underwhelming or problematic. However, she is not without her flaws.
Nita may have a sting like a bee, but she lacks the grace of a butterfly in movement. With a limited range of actions, Nita is heavily dependent on her initial jump from her standard skill and a few dodges to avoid her punches. This makes her challenging to play against mobile opponents and creates an awkward sequence when using her fourth Auctus Drive. I propose that Nita’s melee moveset could benefit from added mobility features, such as incorporating a dash before dealing damage in her ult or adding dashes with every punch of her standard skill. This wouldn’t compromise her balance unless you mean to suggest that Nita is purposefully designed to deal damage only half the time (which seems illogical). The proposed changes would address most of Nita’s gameplay issues while also making her more enjoyable to play, as it would provide additional movement options.
Just a heads-up: On rare occasions, you might momentarily lose your footing or get temporarily incapacitated beyond your usual abilities. This doesn’t occur frequently, but it can be quite frustrating when it does happen. Could you revise this sentence, Seasun?
As a fan, I can’t help but feel that Nita was crafted with a solid concept in mind, yet the realities of gameplay seem to have been overlooked during its design and implementation. It wouldn’t surprise me if she wasn’t playtested before release, and if that’s true, it’s nothing short of amazing how well she turned out. In essence, Nita embodies Seasun’s signature style – a brilliant idea marred by execution flaws. However, let me clarify, I genuinely enjoy the new SSR version of Nita. She’s provided more excitement in my recent gaming sessions than any other operative I’ve reviewed. I sincerely hope that Seasun invests additional care and attention into Nita, as it’s disheartening to see her so near to becoming an exceptional operative, yet still so far out of reach – a distance that, in her current state, seems insurmountable for Nita.
Supplementary Material
Link to spreadsheet
Contains tools for calculating weapons and supply sets, expansion rate calculations, and an optimizer for logistics.
Cheat Sheet

Read More
- Clash Royale Best Boss Bandit Champion decks
- Vampire’s Fall 2 redeem codes and how to use them (June 2025)
- Mobile Legends January 2026 Leaks: Upcoming new skins, heroes, events and more
- World Eternal Online promo codes and how to use them (September 2025)
- Clash Royale Season 79 “Fire and Ice” January 2026 Update and Balance Changes
- Clash Royale Furnace Evolution best decks guide
- How to find the Roaming Oak Tree in Heartopia
- Best Arena 9 Decks in Clast Royale
- FC Mobile 26: EA opens voting for its official Team of the Year (TOTY)
- Best Hero Card Decks in Clash Royale
2025-05-30 09:32