
Where does she even keep all those grenades?

Overview
- B3 that buffs other B3 units when they’re the ones to use burst, especially true damage dealers.
- Great wave clear vs normal mobs during Burst Time with S2 activations.
- Bad attack in Burst, but increased S2 proc frequency and buffs can help wipe out waves of enemies.
- Since lots of normal enemies tend to target the Nikke with the highest ATK, S1 is an amazing survival tool for the unit DPSing.
- Okay DPS vs bosses by default, but her buffs to other B3s can make up for it.
Should You Pull?
Ada is a special, limited-time unit, so it’s unlikely she’ll be available again soon. While she isn’t the strongest damage dealer against bosses, she significantly boosts the power of other units in Battle 3. She’s also very useful in the campaign mode thanks to her area-of-effect attack that deals true damage, and she works particularly well with Vesti: Tactical Upgrade, a top-performing unit for regular campaign maps, even when you’re at a disadvantage. Her ability can also be effective in player-versus-player battles. I definitely recommend getting at least one copy of her.
Newbie/Incomplete Box Section
Ada Wong is an electric-type attacker who excels at providing support and dealing extra damage. Her abilities are straightforward, but very effective.
As a fan, I think her Skill 1 is really helpful for teams focused on Stage 3 battles, especially if they’re hitting enemies with true damage. Her Skill 2 grenade is decent for clearing out regular enemies, and it adds some extra damage when you’re fighting bosses – honestly, it’s how she does most of her damage. Her ultimate does give her some nice buffs that make the grenade even stronger, but the actual attack part of the ultimate? It’s… not great, to be honest.
Basic Information
- Skill 1: Covert Support
- Skill 2: Flash Grenade
- Burst: Secret Agent
- Cooldown: 40s
- Rarity: SSR
- Burst: III
- Weapon: RL
- Class: Attacker
- Element: Electric
- Manufacturer: Abnormal
- Squad: B. S. T.
- Weapon Name: Burst Crossbow
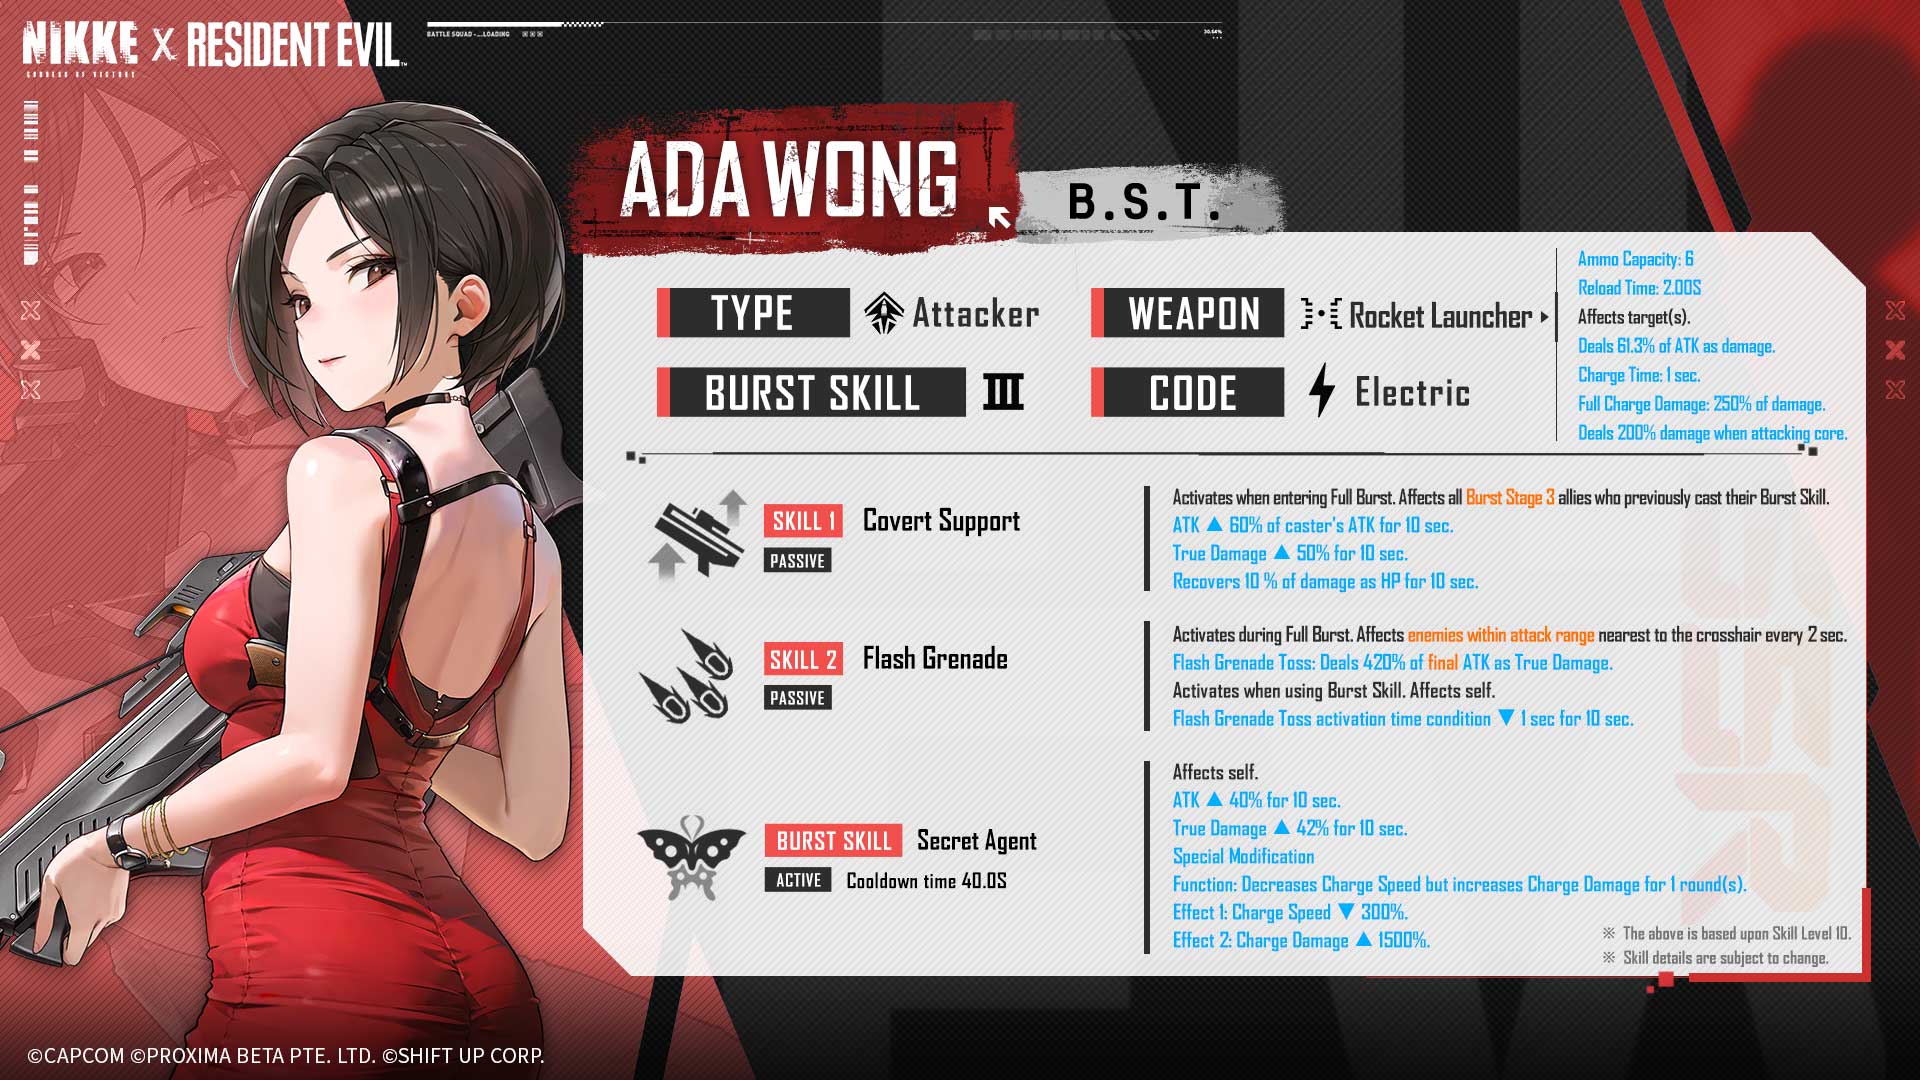
Skill 1: Covert Support
This ability triggers when Full Burst is activated. It benefits all allies currently in Burst Stage 3 who have already used their burst skill.
ATK ▲ 60% of caster’s ATK for 10 sec.
True Damage ▲ 50% for 10 sec.
Recovers 10% of damage as HP for 10 sec.
When Ada enters Full Burst, she significantly boosts the ally who most recently used their burst skill in Battle Position 3. This buff is particularly strong if that ally deals true damage. Since an ally can’t use their burst skill again immediately, only the Nikke in Battle Position 3 who activated their burst will receive the benefit, whether it’s Ada herself or another Nikke in that position.
Ada provides an attack boost that increases with each copy you have, and also benefits from her naturally high attack stat. While this boost is significant, it’s generally better to save your resources for future characters rather than trying to get more copies of Ada specifically for a stronger buff. Even at her base level, a 60% attack boost from Ada is a valuable asset for any attacker in Battle 3.
Ada significantly increases the true damage dealt by the B3 unit who used their burst ability. This buff doesn’t *grant* true damage, so only units already capable of dealing it will benefit – currently, this includes Ein, Laplace, Vesti: Tactical Upgrade, Ada Wong, and, as of this guide, the soon-to-be-released Jill Valentine.
Just like Helm’s ability, Ada’s Skill 1 makes any Nikke it affects heal whenever they deal damage. Because damage-dealing units (DPS) often inflict massive damage, this reliably keeps them alive unless hit by an instantly fatal attack. Since many enemies prioritize attacking the Nikke with the highest attack power, this is a fantastic way to improve their survivability, particularly during campaign missions.
Important note: Rapi, known as Red Hood, is internally treated as a high-tier unit (B3). This allows her to benefit from Ada’s special skill (S1) even when Rapi is set to a lower tier (B1) in gameplay. However, because Red Hood isn’t officially classified as a B3 unit, she can’t actually *receive* the bonus from Ada’s S1 skill. This behavior is by design.

Skill 2: Flash Grenade
This ability triggers while Full Burst is active. It hits enemies closest to your aiming point every 2 seconds, as long as they are within attack range.
Flash Grenade Toss: Deal 420% of final ATK as True Damage.
Activates when using Burst Skill. Affects Self.
Flash Grenade Toss activation time condition ▼ 1 sec for 10 sec.
Okay, so when Ada goes into Full Burst, every couple of seconds she unleashes this awesome explosion right where your cursor is! The best part? It’s True Damage, which makes it super effective for clearing out waves of enemies in the campaign – kind of like Vesti’s Tactical Upgrade. But here’s a little tip: don’t be fooled by how big the explosion *looks*. The actual area you need to hit with it is smaller than you’d think, so aim carefully!
When Ada uses her special ability, flash grenades trigger much more frequently, significantly improving her ability to quickly eliminate groups of enemies during campaign missions. Even though the area of effect is small, she can aim the grenades to effectively target and defeat tightly packed enemies.
Because her quick attacks aren’t very strong, she’ll primarily deal damage through consistent, smaller attacks, particularly when fighting bosses.
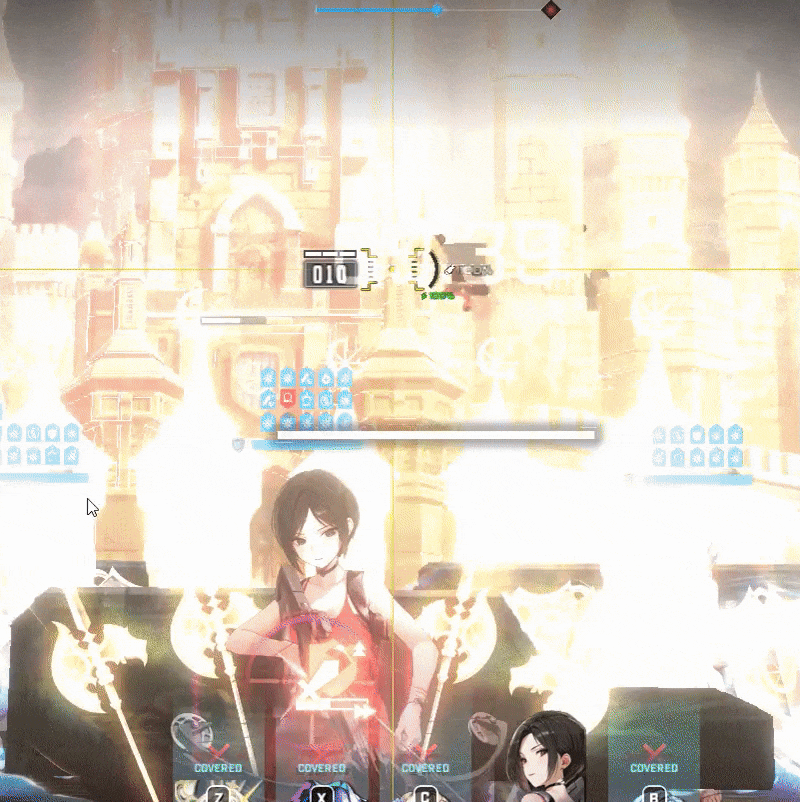
Despite the graphic, the actual damaging hitbox is smaller than what it appears.
Burst: Secret Agent
Affects self.
ATK ▲ 40% for 10 sec.
True Damage ▲ 42% for 10 sec.Special Modification
Function: Decreases Charge Speed but increases Charge Damage for 1 round(s).Charge Speed ▼ 300%
Charge Damage ▲ 1500%
As a huge Ada fan, I’ve noticed she really shines when she stacks up her attack and true damage. It makes her Flash Grenade (S2) hit *so* much harder, and it’s even more effective if you use her S1 first. Basically, the more damage she builds up, the more devastating that Flash Grenade becomes!
Ada can briefly modify her weapon to fire one powerful shot. While this shot appears to deal significant damage, it’s actually not as strong as the numbers suggest. Unlike some other characters, like Maxwell or Snow White, who change weapons during their burst attacks, Ada continues to use her standard weapon for this special attack.
Ada’s consistent weapon, combined with a massive 1500% charge damage boost, significantly amplifies her base attack power of 61.3%. While this sounds powerful, the reduced charge time actually weakens her. It now takes around 4 seconds to fully charge her ‘super shot,’ which ends up dealing less damage than comparable attacks from other characters.

Ada’s Burst doesn’t change her weapon in use.


Assuming no other modifiers, this is the damage the one shot is capable of dealing.
Secret Agent
61.3% x 1750% ~ 1072%
4s charge time.
Pierce Shot
813.42% x 300% ~ 2440%
2s charge time
Seven Dwarves: I
499.5% x 1000% = 4995%
5s charge time
To illustrate, her ultimate attack, even at its strongest, deals around 1072% damage. A single use of her Skill 2 grenade while the ultimate is active almost matches that damage, and it happens in just one second. By the time she finishes firing the ultimate attack, the four grenades activated will collectively deal significantly more damage.
Even though the burst attack itself isn’t very strong, it’s still worth using because Ada can deal more damage by fully charging and releasing it than by performing four regular, fully charged attacks in the same amount of time.
Campaign
Ada truly excels when supporting her team. She functions similarly to Vesti with her Tactical Upgrade, dealing significant damage in a limited area, but only during her burst phase. While Ada can perform well independently, her true damage becomes increasingly valuable when her team is behind, making her a fantastic support character.
Okay, so her smaller area-of-effect attack can still clear out groups of enemies, but I really need to be precise with where I aim it. Honestly, she feels like a slightly weaker version of Vesti: Tactical Upgrade, and that’s fine – they actually work really well as a team. I’m seeing the same thing with Ein in campaign mode, and it’s kinda true for Laplace (F) and Nikkes who don’t deal true damage too – they all fill different roles and can work together nicely.
Because most attacks focus on the Nikke with the highest attack power, Ada’s Skill 1 is helpful for boosting the healing of damage-dealing Nikke during quick bursts of action. When enemies have a lot of health and only true damage can make a real impact, Ada’s Skill 1, which boosts true damage, becomes even more valuable. Additionally, Ada’s Skill 2 works with true damage from other Nikke to quickly eliminate large groups of enemies.
Arena
Ada can deal significant damage in the arena with her skill S2, but its limited area of effect means it typically only hits a single enemy. Despite her weapon’s distinctive design, she functions as a typical Rapid Light unit with standard damage generation. To maximize her effectiveness, she benefits from additional damage boosts from other player-versus-player units.
Special Interception | Union Raid | Solo Raid
True damage is very strong when a team is behind, but loses its impact in situations where teams are evenly matched. Ada’s second skill does decent damage to bosses when her burst ability is active, but her burst itself isn’t very effective. Generally, Ada contributes more to boss fights by supporting the main damage dealer rather than dealing damage herself.
Ada’s burst ability isn’t very strong, making her a good fit for a strategy involving Miranda (F). When Miranda has her preferred item and the battle reaches at least Phase 2, she boosts the attack power of the Nikke with the highest ATK stat. Ada can consistently achieve this high ATK thanks to her Skill 1 and burst, making her a strong candidate for this tactic.

When Miranda reaches her highest rank (S2), she significantly boosts a unit’s critical hit chance – adding 85% to the usual 15%, for a total of 100%. The unit keeps this 100% crit chance as long as they don’t fire. Because Ada’s special ability (S2) launches grenades automatically without needing a shot, her grenades will always critically hit while Miranda’s buff is active.
Ada’s burst ability isn’t very strong, so the best strategy is to have her find cover while powerful, critical-hit grenades handle most of the damage. You can start charging your next shot towards the end of the burst to make the tactic more efficient, and fire just before the burst effect ends. This is the most effective way to maximize Ada’s damage output against bosses.

Strengths
- Provides a big DPS and survivability buff to B3 nikkes that use their burst, especially true damage dealers.
- Decent wave clear with grenades.
- Good supplemental damage against bosses.
- True damage increases in value the higher the campaign deficit.
Weaknesses
- Terrible attack portion of burst.
- S2 AoE is quite small.
- Regular RL burst gen hurts PvP potential.
Rating
| Category | Rating |
|---|---|
| Overall | S |
| Story | S |
| Bosses | S |
| Arena | S |
Recommended Cubes
Doll Priority
Ada is mainly a support character who deals damage, so she doesn’t need a top-tier doll like characters focused on damage do. While a doll with high attack power can make her support abilities stronger, it’s usually not worth spending extra resources to get her one unless you have plenty to spare. I’d put her doll priority in the middle range.
Expected Skill Priority
| Nikke | Budget Skill Investments | Recommended Skill Investments | Skill Priority | Notes | Investment Priority |
|---|---|---|---|---|---|
| Ada Wong | Skill 1: 7 Skill 2: 7 Burst: 4 | Skill 1: 10 Skill 2: 10 Burst: 4 | S1 = S2 | Skill 1 is where a lot of her power comes from, the supportive buffs she gives to other B3 units, especially fellow true damage dealers. Skill 2 is her main, and practically only source of DPS. While her burst is terrible, the buffs it provides for her grenades are still valuable. It can be increased further than the minimum to get a bit more damage out of them. | High |
Overload Gear Priority
Gear Priority = Head > Gloves > Chest > Boots
| Attribute (Sub-Stat) | Priority | Recommended | Notes |
|---|---|---|---|
| Increase Element Damage Dealt | ★★★★★ | 4x | Wanted for Union Raids and Solo Raid content. |
| Increase Hit Rate | ☆☆☆☆☆ | 0x | — |
| Increase Max Ammunition Capacity | ★★★★☆ | 1-2x | Ammo |
| Increase ATK | ★★★★★ | 4x | Simply more damage. |
| Increase Charge Damage | ☆☆☆☆☆ | 0x | — |
| Increase Charge Speed | ☆☆☆☆☆ | 0x | — |
| Increase Critical Rate | ☆☆☆☆☆ | 0x | — |
| Increase Critical Damage | ☆☆☆☆☆ | 0x | — |
| Increase DEF | ☆☆☆☆☆ | 0x | — |
Read More
- Clash Royale Best Boss Bandit Champion decks
- Vampire’s Fall 2 redeem codes and how to use them (June 2025)
- World Eternal Online promo codes and how to use them (September 2025)
- Best Arena 9 Decks in Clast Royale
- Country star who vanished from the spotlight 25 years ago resurfaces with viral Jessie James Decker duet
- M7 Pass Event Guide: All you need to know
- Mobile Legends January 2026 Leaks: Upcoming new skins, heroes, events and more
- Solo Leveling Season 3 release date and details: “It may continue or it may not. Personally, I really hope that it does.”
- Kingdoms of Desire turns the Three Kingdoms era into an idle RPG power fantasy, now globally available
- JJK’s Worst Character Already Created 2026’s Most Viral Anime Moment, & McDonald’s Is Cashing In
2025-09-26 00:55