Commander… would you really use your resources on someone like me?

Overview
- B1 Iron AR Defender that hard counters Electric DPS, especially at the start of combat.
- Very good attack buff when using Burst for allies.
- Constant shields make her very annoying to deal with.
- Can pseudo-taunt with her high self-ATK buff when offburst in PvE, but lack of real taunt is a shame.
- Lack of cooldown makes her niche for PvE.
- Incredible on PvP offense vs Electric DPS defender teams, only really usable in CA defense.
Should You Pull?
Beyond simply being a popular character, her effectiveness really depends on the situation. She excels at destroying opposing teams in Arena that rely on Electric damage dealers like Scarlet, Cinderella, Rosanna, and, to a lesser degree, the summer version of Anis. However, using her as a defender in Special Arena is risky. Opponents can easily bypass her strength by simply avoiding using Electric attackers against her.
In player-versus-environment (PvE) content, while her attack boost is useful and has no cooldown, it’s hard to include her in teams solely for that benefit. Other raid units, like Tove and Miranda, both offer additional advantages beyond just an attack boost, making them more valuable for offensive teams.
When using her in PvE, her ability to significantly reduce damage from Electric enemies should be a key strategy. This is particularly useful on Electric-themed campaign maps where enemies immediately pose a threat, like those with fast, attacking raptors or powerful beam weapons. Reducing the damage taken from these enemies will greatly improve your team’s survivability, especially when you’re already at a disadvantage.
Okay, so as a fan, here’s my take: I wouldn’t recommend spending resources on her unless you’re really into PvP, or you’re confident you’ll need that Electric damage type for certain PvE fights. Her attack buff is nice, but honestly, it doesn’t feel strong enough to make her a must-have right now. Still, I’m happy they didn’t just throw her design away – she’s definitely an interesting character and worth discussing!
Newbie/Incomplete Box Section
Label is a powerful Iron AR Defender specifically designed to withstand heavy Electric damage. It’s also very durable overall, though its effectiveness against other damage types has some limitations, which we’ll discuss further.
She excels in player-versus-player (PvP) battles when used as an attacker. Sending her against teams with an Electric damage dealer will often lead to a win. However, don’t use her on defense teams, as opponents can easily counter her by simply not using Electric attackers.
In player-versus-environment (PvE) combat, she excels when used strategically. Her ability to significantly reduce electric damage for the team during the first five seconds is especially valuable against opponents who deal high burst damage at the start of a fight – but only if those opponents are using electric attacks. She also consistently provides a shield and can effectively draw enemy attention, further enhancing the team’s defense.
Although her attack boost is quite strong, the fact that it doesn’t have a cooldown makes it difficult to include her in most teams. She’s best used specifically to counter characters who deal Electric damage.
Basic Information
- Skill 1: Meeting and Parting (Imagined)
- Skill 2: Sweetness of Love (Imagined)
- Burst: Bursting Heart
- Cooldown: 20s
- Rarity: SSR
- Burst: I
- Weapon: AR
- Class: Defender
- Element: Iron
- Manufacturer: Elysion
- Squad: Best Seller
- Weapon Name: Gloomy Mood
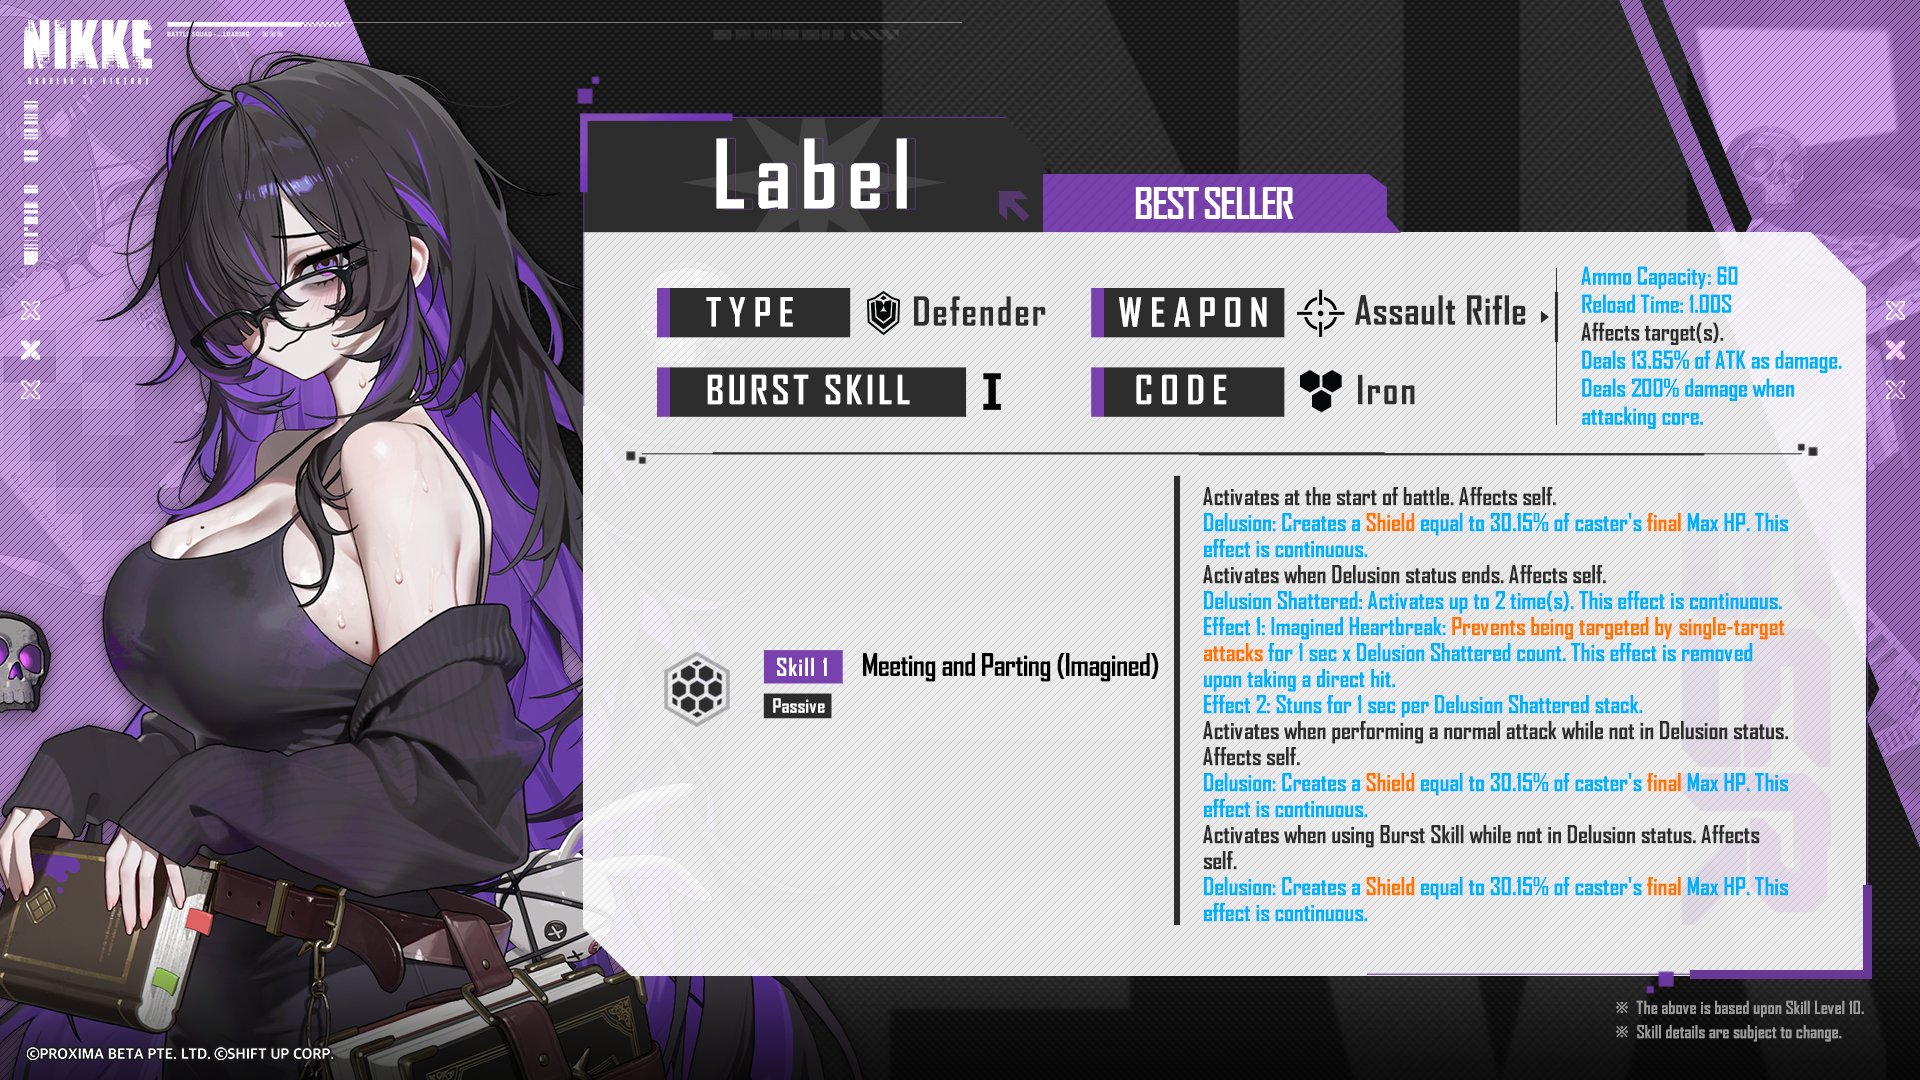

Skill 1: Meeting and Parting (Imagined)
This ability has several effects that trigger based on the character’s ‘Delusion’ status.
At the start of battle: A shield is created, absorbing damage equal to 30.15% of the character’s maximum health. This shield lasts for the duration of the battle.
When Delusion ends: The ‘Delusion Shattered’ effect activates up to twice. This effect provides two benefits:
Imagined Heartbreak: For 1 second per stack of ‘Delusion Shattered’, the character becomes untargetable by single-target attacks. This protection is lost if the character is directly hit.
Stun: The character stuns enemies for 1 second per stack of ‘Delusion Shattered’.When performing a normal attack or using a Burst Skill without being in Delusion: A shield is created, absorbing damage equal to 30.15% of the character’s maximum health. This shield lasts for the duration of the battle.
Okay, so as a Label player, here’s how her whole thing works: she starts every fight with this really strong shield – she calls it her Delusion. While that shield is active, she gets a bunch of awesome benefits from one of her abilities. Honestly, the shield is everything with Label – her whole kit revolves around keeping it up! But, if the shield does get broken, it’s not ideal. Each time it breaks in a fight (it can happen twice), she gets a ‘Delusion Shattered’ stack, which changes things up for her. It’s super important to protect that shield!
When Label’s shield breaks, she stuns herself for a duration based on how many times it’s been broken before. The first time, it’s a 1-second stun, and the second time it’s a 2-second stun. After that, she’ll always be stunned for at least 2 seconds whenever her shield breaks.
When Label’s shield breaks, she becomes temporarily immune to single-target attacks, giving her a safe window to regain her shield. However, this protection doesn’t apply if she’s the last enemy remaining, or against attacks that hit multiple targets.
Label automatically regains her shield with her next basic attack if it’s currently down. Using her Burst ability also restores her shield, but only if she doesn’t have one already – you’ll notice this if she uses Burst while her shield is recharging. Because she recovers her shield so quickly, and it’s a substantial amount of protection, Label can be a very difficult opponent to take down.
Skill 2: Sweetness of Love (Imagined)
This ability activates at the start of each battle. It first benefits all allies (excluding yourself) by reducing damage taken from Electric Code enemies by 70.4% for 5 seconds, and this effect happens once per battle.
While you are under the Delusion status, you’ll gain a 70.4% boost to your Burst Gauge filling speed and a 93.39% increase to your ATK, both continuously. You’ll also take 70.4% less damage from Electric Code enemies continuously.
When in Shared Delusion status, all allies (excluding yourself) receive an ATK boost equal to 80.36% of your own ATK, continuously.
Label starts battles by significantly reducing damage taken by her allies (but not herself) from Electric Code enemies for 5 seconds. This is her biggest strength. In the Arena, she can shut down teams focused on Electric defense. In PvE, she’s great for surviving tough Electric-themed levels, especially at the beginning when facing enemies like kamikazes or strong beam attacks that deal Electric damage.
While Label has her shield active, she rapidly builds her Burst Gauge, gains a significant attack boost, and takes less damage from Electric enemies. Although this Burst Gauge boost is substantial, it’s more of a helpful addition than a complete fix – her Burst Gauge still fills somewhat slowly overall as an AR unit. However, it does improve her performance in player-versus-player combat when combined with her other abilities.
Label’s initial ATK boost might not seem impactful, as she isn’t meant to be a primary damage dealer, and currently lacks other ways to increase her damage output. However, this large, lasting ATK buff means she’ll generally have the highest ATK stat of any Nikke, even as a Defender, when compared to others not in their Full Burst state. While Label at LB0 will take time to reach the ATK levels of your existing damage dealers, with the right equipment and Wishlist bodies, she eventually will.
Many enemies and bosses automatically target the Nikke with the highest Attack stat. Because of this, increasing her Attack effectively draws their fire, acting like a limited-range taunt. While not a perfect taunt, it’s useful for diverting enemy attention away from your damage dealers. Paired with her shield, she’s capable of absorbing a lot of damage, making her a strong tank for the team.
Label provides a constant damage reduction against Electric Code enemies while her shield is active. However, this reduction doesn’t impact the shield’s durability itself. Because the shield and the damage reduction are separate, the reduction only protects her from attacks that bypass the shield entirely, making the benefit less effective.
Label’s Burst ability applies a status effect called Shared Delusion, which significantly boosts the caster attack power of her allies. This buff is exceptionally strong – despite Defenders generally having lower attack stats, the boost is powerful enough to make it the best attack buff available on a 20-second cooldown, quickly surpassing the effectiveness of Brid: Silent Track’s previous buff.
Because she doesn’t benefit from the attack boost from Shared Delusion, her ability to draw enemy fire mostly stops when her ultimate is active. However, that attack boost is meant to help damage-dealing characters defeat enemies quickly, so this isn’t usually a big problem.
Burst: Bursting Heart
Cooldown: 20 seconds
Increases maximum HP by 20.26% for 10 seconds. With Shared Delusion, the Shield created by Label becomes invulnerable for 10 seconds.
Label boosts her maximum health and makes her Shield completely invulnerable for 10 seconds. During this time, normal attacks won’t damage her shield, and it can’t be broken. This ensures any abilities that rely on her shield remaining active will last the full duration of the effect.
It’s important to remember that while the Shield makes its user completely protected, Label herself is still vulnerable. Most attacks won’t get through the Shield, but those that can will still damage Label. This includes attacks that ignore cover and shields, ongoing damage if Label has already been hurt, quick follow-up attacks, and any attacks that simply don’t target shields. This is especially relevant in player-versus-player combat, but also applies somewhat to battles against computer-controlled enemies.
Campaign
Okay, so Label isn’t taking anyone’s place, but she’s a total lifesaver on those tough Electric damage maps. Seriously, if you’re getting one-shotted right off the bat, her Skill 2 can completely turn things around – a 70% damage reduction is HUGE. I’ve been stacking that with the maxed-out SR collection item for another 17% reduction, and my story-built units just tank anything Electric throws at them for those first five seconds. It’s a game changer!
Even after a few seconds, her ability to draw enemy fire onto her regenerating shield – thanks to her high attack power – remains useful. When her shield breaks, she’ll briefly lose the ability to draw fire, especially against enemies that focus on the strongest attackers. This makes her most effective against powerful, single attacks, as those will quickly break her shield instead of slowly chipping away at it.
Her attack boost on turn one is strong while it lasts, but it doesn’t hit its full potential early on with a low-level caster. She only provides an attack boost, which isn’t very helpful from the first slot during campaign missions, particularly when you’re behind. Without a cooldown reduction ability, she’s hard to fit into standard campaign teams, but she’s a reliable option when you specifically need to counter Electric enemies.
Arena
Label’s most valuable skill in Arena is her ability to immediately disable Electric damage-dealing units for 5 seconds at the start of a fight. Arena matches are quick, often decided within the first use of a character’s ultimate ability, so those 5 seconds can be crucial in PvP. Label effectively counters Electric units set to a defensive strategy, including Scarlet (particularly when paired with Trina), Cinderella, Rosanna, Ice Rose, and to some degree, sAnis.
Because sAnis often deals significant Electric damage even after the initial 5 seconds while her Burst is active, she’s less impacted by certain effects. However, other units are definitely affected. Scarlet is frequently used in quick Burst strategies, especially when paired with Trina, and Cinderella often participates in fast Bursts as well. If Label is built correctly, her strong self-attack buff from her Skill 2 means that Rosanna’s attempt to remove buffs is less effective against her, as it only removes one buff from Label compared to two from the units with the highest final attack. It’s important to remember that while Label’s effects are ongoing, Rosanna’s dispel ability does remove those buffs until Label reapplies her shield.
This assessment focuses solely on Label’s performance on offense. Her defensive capabilities in non-Champion Arena are significantly weaker. Label struggles on defense because opponents can easily counter her by simply not using Electric damage dealers, negating her primary strength. Even worse, if the enemy team does use units that benefit from the increased hits her shield provides – boosting their damage output – Label actually hurts her own team’s defense. Therefore, it’s best not to use Label in standard defensive setups.
Champion Arena is unpredictable. Once teams are set and start the best-of-five tournament, Label has no control over who she’ll face. She might get a good opponent and win easily, a difficult one and lose, or end up in a fairly even match where the outcome is uncertain.
Special Interception | Union Raid | Solo Raid
Okay, so playing Label, I’ve noticed she’s actually easier to use during boss fights than in the regular campaign. The thing is, a lot of what makes her strong defensively doesn’t really work as well. See, bosses usually don’t start fights with these massive, team-wipe attacks like enemies in the campaign do. While I can still try to pull the boss’s attention with her higher attack stat and keep her shield up, it’s not always reliable. It really depends on which boss we’re fighting, because some just don’t attack that way consistently.
Although she provides a solid damage boost to allies by increasing their attack power – especially as you improve her and her equipment – the problem is that’s all she does. It’s often not efficient to bring a character into raids simply to provide an attack buff when other characters could offer more impactful abilities.
MirandaT and ToveT are powerful units that offer significant advantages beyond a simple attack boost. ToveT enhances shotguns with increased attack power, ammo, fire rate, critical hit chance, and damage. MirandaT guarantees a critical hit and greatly increases critical damage, in addition to its attack boost. In comparison, Label only provides an attack buff, and its effectiveness relies on having a strong team and upgraded equipment.
Label could be much more useful in the future if she had a better unit to pair with for her ability cooldown. Her attack buff is actually more effective for overall damage output than Liter’s, assuming both units have similar stats. Specifically, an 80% attack boost from a Defender like Label translates to roughly a 53% attack boost for an Attacker, while Liter only provides an 80% attack boost for 5 seconds after using his ultimate three times.
If you’d like her to be more widely used in raids, hoping for a popular item boost would be great. It’s a shame either she or the Helm: Aquamarine aren’t stronger.
Strengths
- Hard counter to Electric DPS in PvE and PvP, especially at the start of combat.
- Has the highest 10s ATK buff on a 20s cooldown, though it needs to scale up to be that way.
- Can pseudo-taunt enemies that base their targeting on the highest ATK opponent outside of Full Burst.
- Constantly regenerating shield makes her very tough to kill.
- So much value into one skill (S2) makes her cheap to get value out of.
- Boosted burst generation while shield is up increases her value in PvP and supplements other burst gen in all other context.
- For how easy it is to recover the shield, it is honestly really big, even without much investment.
- Girlfailure fans, rejoice.
Weaknesses
- No cooldown renders her into a niche position in most other context.
- Not that good in regular PvP defense, since enemies can easily account for her presence.
- Shield doesn’t benefit from the damage reduction, rendering it weaker than one would hope, even vs Electric DPS.
- The damage reduction to the team only lasting 5 seconds means it’s only for short term protection.
- Only offers an ATK buff to allies offensively, reducing the value of bringing an off-burst cooldown unit for her; her defensive capabilities must shine through for it to be worthwhile.
- Shield breaking redirects damage away from her, which could prove fatal to DPS units if it happens at an inopportune time.
- Damn, bitch, you live like this?
Rating
| Category | Rating |
|---|---|
| Overall | A |
| Story | A |
| Bosses | S |
| Arena | S |
Recommended Cubes
As a big fan, I’ve found that combining the Tempering Cube with any SR collection item, plus her natural damage reduction, makes her super tanky – especially against attacks that get past her shield. The Vigor Cube is amazing too, because it really boosts her shield’s health, making it much harder to break. Now, while those higher-level cubes can increase her attack power, I’d suggest saving those for situations where you don’t need her incredible durability, because that’s really what makes her shine!
Doll Priority
She works exceptionally well with defensive SR Dolls. The damage reduction, extra health when stunned, and boosted defense all help her stay alive longer. While these stat improvements are beneficial, she’s best suited for specific situations, mainly attacking in player-versus-player combat and, to some degree, the Champion Arena.
If you’re considering using this character, I suggest giving her a level 5 doll and sticking with that for now. It offers good enough benefits without requiring a lot of extra investment. Set her doll priority to Medium.
Expected Skill Priority
| Nikke | Budget Skill Investments | Recommended Skill Investments | Skill Priority | Notes | Investment Priority |
|---|---|---|---|---|---|
| Label | Skill 1: 4 Skill 2: 4 Burst: 1 | Skill 1: 4 Skill 2: 7 Burst: 1 | S1 << S2 | Skill 1 determines the size of her shield. It has a good enough base value, so it doesn’t have to be leveled that much. It can be leveled to 7 if needed. Skill 2 is where all the goodies are at, including the ATK buff from using Burst, rendering leveling Burst quite useless. The damage reduction, burst generation increase, self ATK buff, everything. It’d be a must-max if she weren’t niche, to be honest. You can max it if you wish, it honestly scales incredible, even for how niche she is. Burst scales poorly. The invulnerability is already at max duration at the start, and the max HP gain is very low per level. The reason it is at 1 instead of 4 is because it really does scale that badly to use Burst manuals for, which are so valuable. | Medium |
Read More
- Clash Royale Best Boss Bandit Champion decks
- Vampire’s Fall 2 redeem codes and how to use them (June 2025)
- World Eternal Online promo codes and how to use them (September 2025)
- Best Arena 9 Decks in Clast Royale
- How to find the Roaming Oak Tree in Heartopia
- Mobile Legends January 2026 Leaks: Upcoming new skins, heroes, events and more
- Solo Leveling Season 3 release date and details: “It may continue or it may not. Personally, I really hope that it does.”
- ATHENA: Blood Twins Hero Tier List
- M7 Pass Event Guide: All you need to know
- Sunday City: Life RolePlay redeem codes and how to use them (November 2025)
2026-01-17 02:40