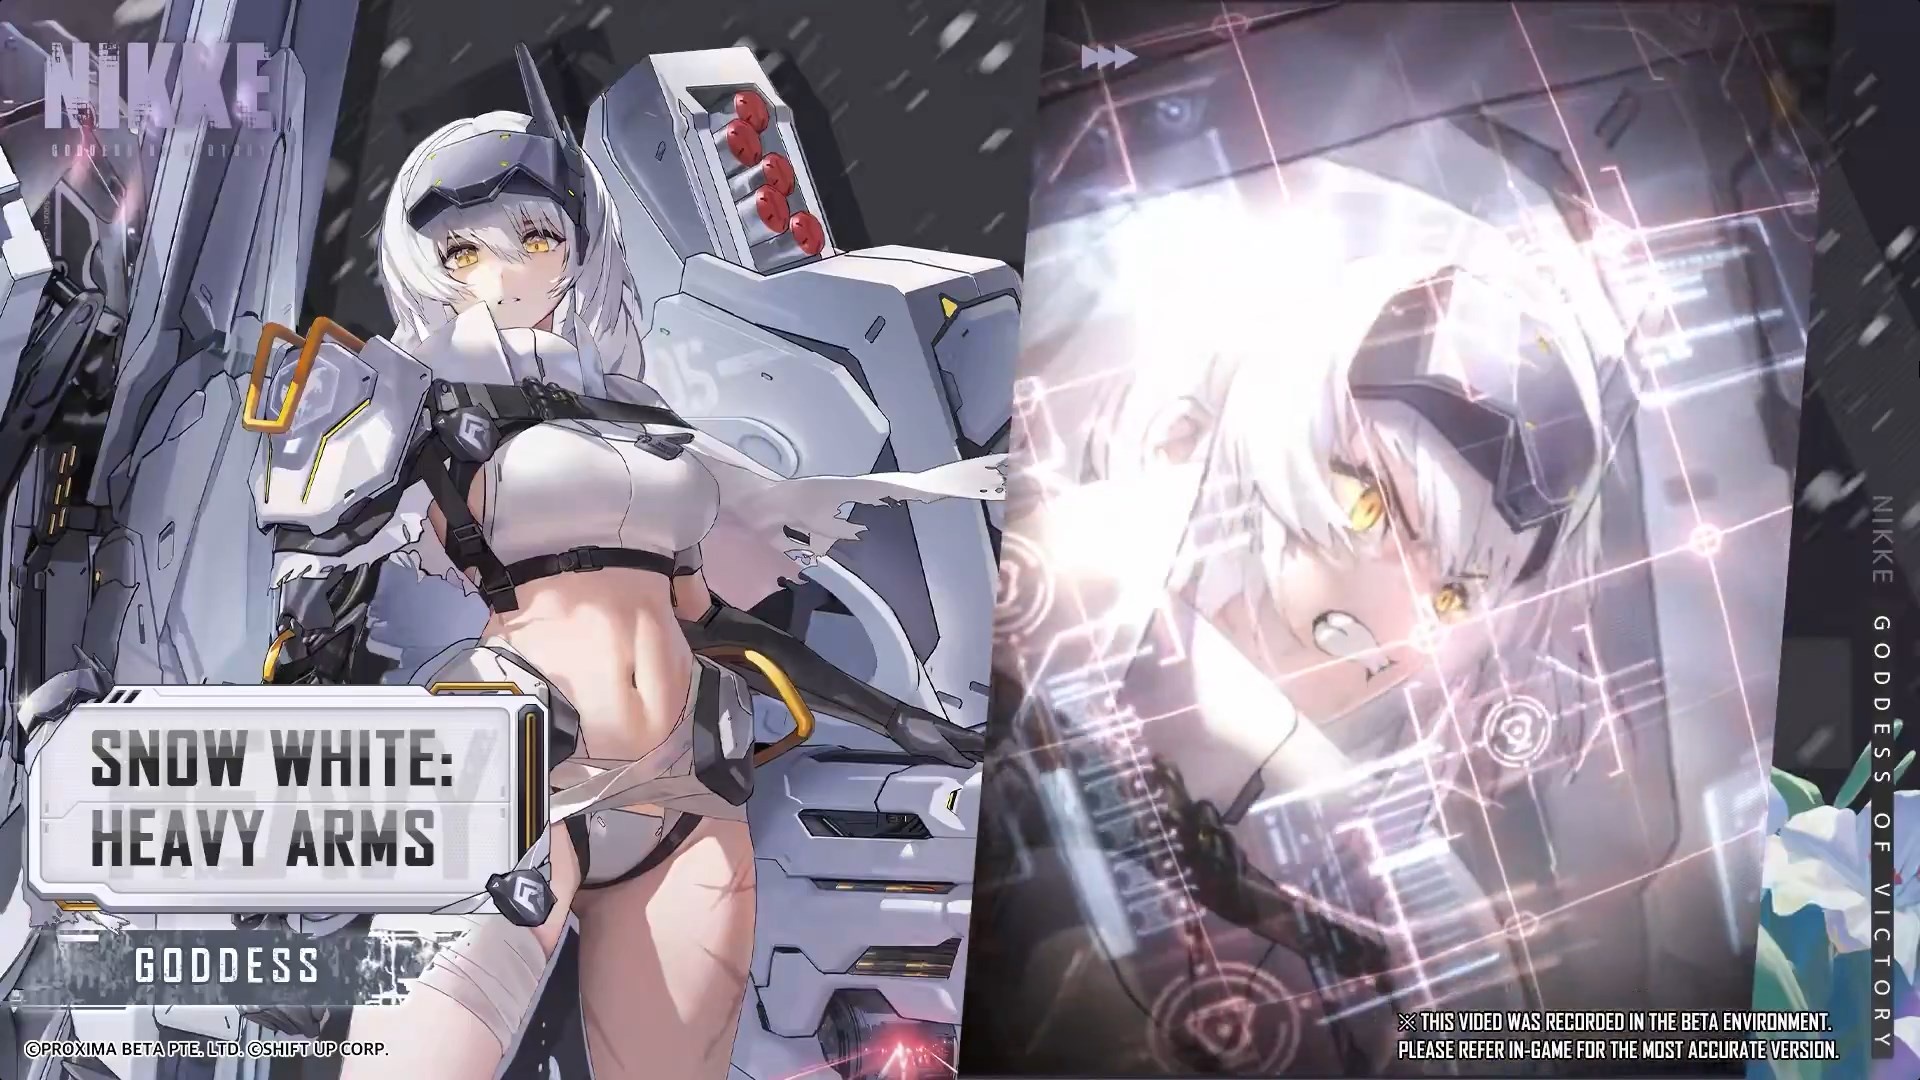
All she hungers for now is revenge.

… and your growth mats.
Overview
- B3 Water SR Attacker Unit that hits enemies with sequential attacks.
- Highest burst gen in the game regardless of content currently, especially in campaign. Makes her relevant regardless of content.
- Highest permanently available Water DPS in the game, making her an important unit to obtain for anyone.
- Amazing single-target damage against one enemy.
- Above average wave clear, especially in high deficit (35%) and below.
- Some of the highest damage against coreless and partless bosses, in spite of her Pierce ability, since the bulk of her damage is from sequential attacks.
- Low ammo consumption and fixed charge speed means she needs less optimal OLs than other DPS units.
Should You Pull?
She’s currently the most powerful Water damage dealer available in the game. For years, Water units have lacked strong offensive options compared to other elements, so she’s a huge improvement for all Water teams, not just for challenging raids. She’s expected to remain the best readily accessible Water damage dealer once she’s added to the Wishlist and Mold shop, making it a good idea to start building her as soon as possible.
She’s an incredibly powerful damage dealer, not just with Water teams, but with others too, due to her versatile abilities. She also generates energy for her team’s special attacks faster than anyone else in the game, in both player-versus-environment and player-versus-player situations. This makes her useful in any role – as a supporting damage dealer or the main attacker – and a valuable addition to any player’s team.
With the release of Snow White: Heavy Arms happening at the same time as Rapi: Red Hood’s rerun – who is currently considered the best damage dealer in the game – it’s a difficult decision which character to prioritize. Both are excellent, and Snow White offers more flexibility in team building for PvE content as she can fit into either the B1 or B3 slot.
If you don’t have both Rapi: Red Hood and the other unit, I think Rapi: Red Hood should be your first focus. She’s more useful in a wider range of game modes, especially outside of player-versus-player combat. These 1% chance units are very difficult to obtain, so even though the current event and New Year’s rewards will give you plenty of chances to pull for them, it’s best to use any saved mileage for one of them while focusing your other pulls on the other unit.
Newbie/Incomplete Box Section
Snow White, also known by nicknames like SWHA or Swole White, is a powerful Water-type attacker in Battle 3. What makes her special is her attack style when fully charged, which lets her quickly defeat both groups of enemies and single, tough opponents.
Her Full Charge attack hits so many times, no matter how many enemies are nearby, that she currently generates more burst damage potential than any other character, particularly when playing the campaign.
Okay, so as someone who plays a lot, I seriously recommend getting her. She’s by far the best consistent water damage dealer we have right now. Water really needs a boost to keep up with elements like Wind, which got a huge power-up for the anniversary, and she’s the way to do it. Basically, if you want to build a strong water team, you need her.
Basic Information
- Skill 1: Seven Dwarves V + VI
- Skill 2: Shades of White
- Burst: Seven Dwarves Fully Active
- Cooldown: 40s
- Rarity: SSR
- Burst: III
- Weapon: SR
- Class: Attacker
- Element: Water
- Manufacturer: Pilgrim
- Squad: Goddess
- Weapon Name: Seven Dwarves I + II
Normal Attack Information
Snow White is most effective when she fully charges her shots. If you rapidly fire them instead, she’ll perform like a standard sniper rifle, but this isn’t ideal because of how her full charge ability functions.
When Snow White is charging her Full Charge attack, she quickly scans the screen for up to five enemies, focusing on those nearest her aiming point. Once scanned, enemies will display a target marker and become ‘Lock On Targets’. When she releases the attack, a piercing shot travels across the screen dealing minor damage to everyone, followed by five focused attacks that specifically target those Lock On Targets.

Initially, the game seemed to prioritize enemies directly in your sights. Later, it began targeting enemies at a greater distance instead.
These attacks happen one after another and will spread evenly across all enemies you’ve targeted. However, they only hit enemies currently locked on with your reticle – those without a lock-on won’t be affected. If an enemy you’re targeting dies before being hit, the attack will automatically move to another available target.
Okay, so if there’s just one enemy, all five of my attacks lock onto them and just melt their health bar. Basically, I do a ton of damage when it’s a one-on-one fight!
Activating Burst significantly expands targeting options and increases the number of attacks delivered with a fully charged shot. It triples the number of targets you can lock onto and boosts the number of consecutive attacks from 5 to 15, allowing for up to two powerful bursts.
Because she functions as a Sniper Rifle, her standard attacks deal extra damage to targets at long distances. However, damage from hitting the enemy’s weak spot or from rapid attacks isn’t increased by this long-range bonus.
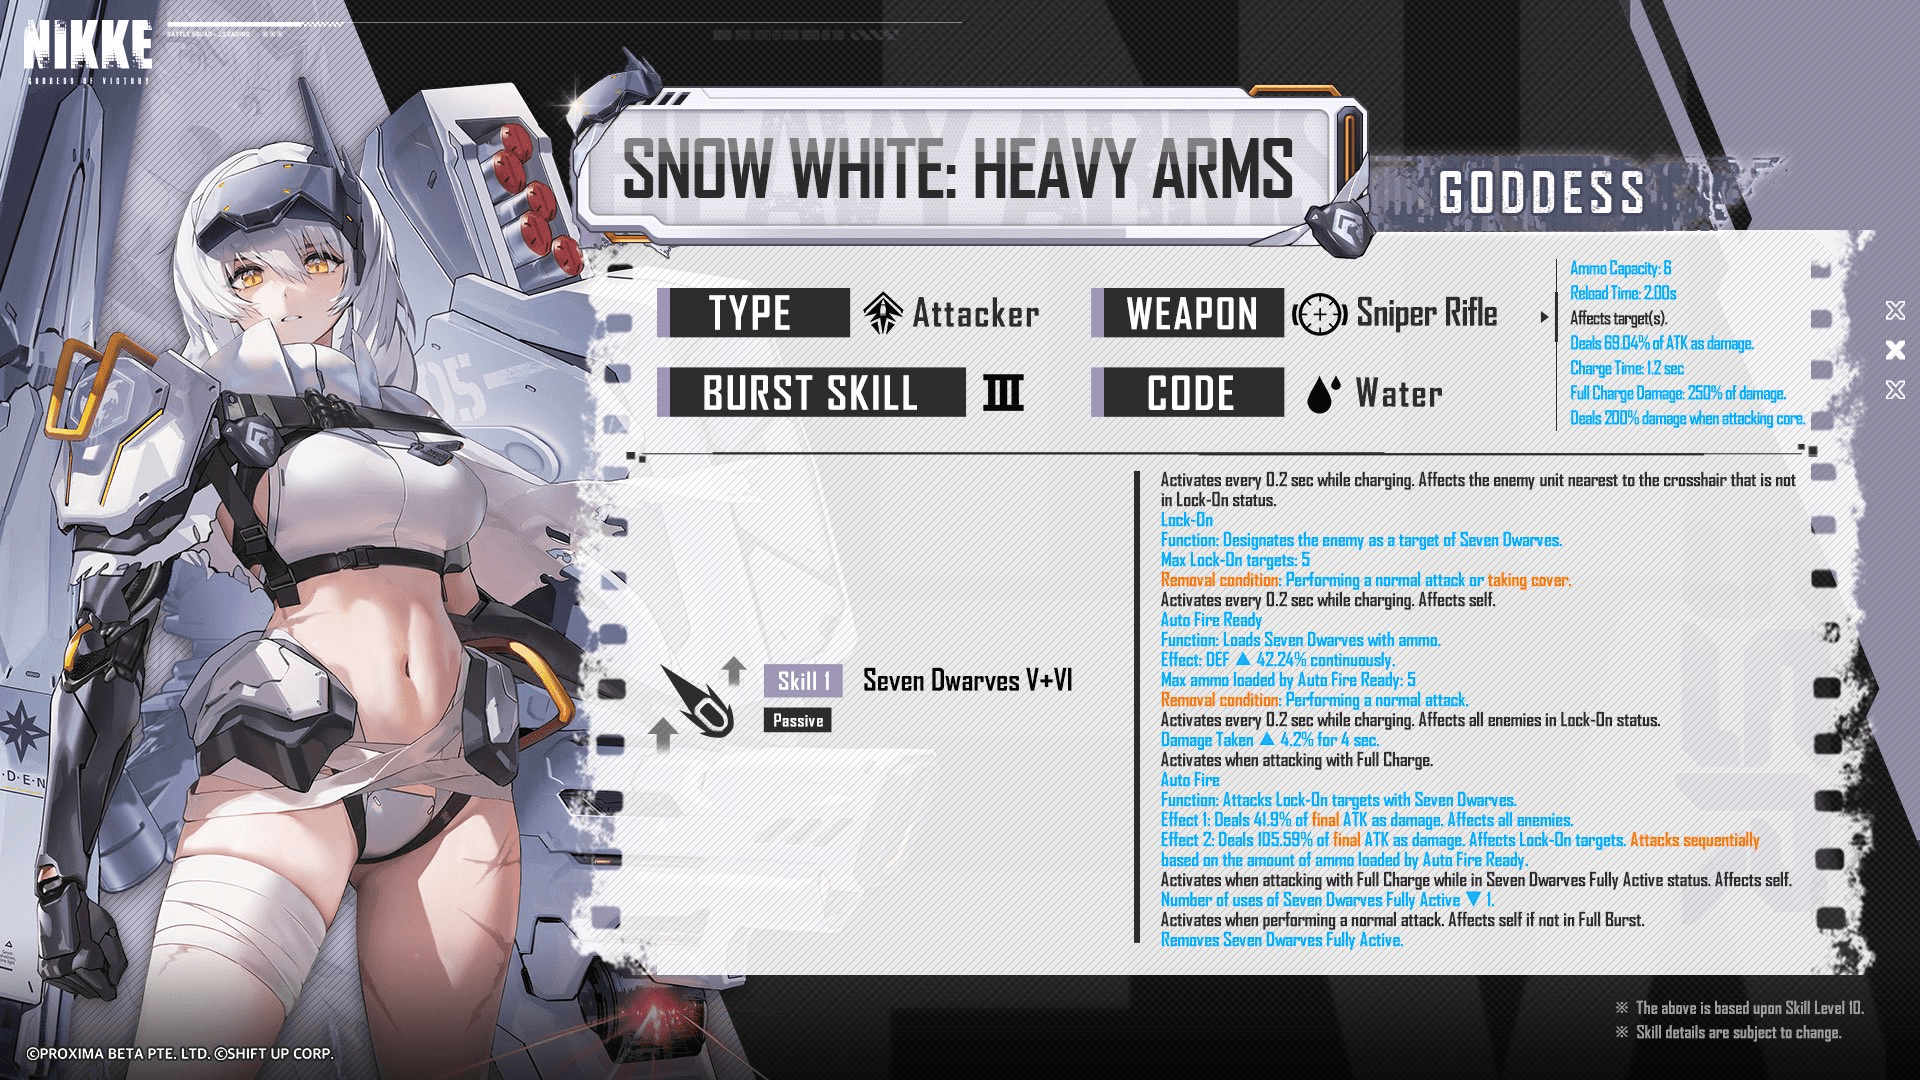
Skill 1: Seven Dwarves V + VI
This ability triggers every 0.2 seconds while charging. It targets the nearest enemy not currently locked on.
Lock-On: This designates an enemy as a target for the Seven Dwarves, with a maximum of 5 targets.
Lock-On is removed by performing a normal attack or taking cover.This ability also triggers every 0.2 seconds while charging, affecting the user. It provides a 42.24% continuous defense boost, loading up to 5 ammo for the Seven Dwarves. This boost is removed by performing a normal attack.
Finally, it activates every 0.2 seconds while charging, affecting all enemies that are locked on. These enemies take 4.2% increased damage for 4 seconds.
When attacking with a full charge, the Seven Dwarves automatically fire at locked-on targets. This deals damage equal to 41.9% of your final attack power to all enemies, and 105.59% to locked-on targets. The number of attacks is determined by how much ammo was loaded by the Auto Fire Ready ability.
If you attack with a full charge while the Seven Dwarves are fully active, it uses one charge of the fully active state.
Performing a normal attack (when not in Full Burst mode) removes the fully active state of the Seven Dwarves.
When SWHA prepares an attack, she scans for enemies over 1.2 seconds. Every 0.2 seconds during this charge-up, she targets the enemy closest to her aiming point, but prioritizes those with a ‘Lock On’ debuff – indicated by a reticle above their head. Enemies with the ‘Lock On’ debuff take slightly more damage.
Okay, so when I’m charging up my attack, my defense goes up, which is good because I’m totally exposed and can’t hide. But here’s the catch: I can still get stunned! If I get hit with a stun, it completely cancels the charge and I have to start all over again. It’s a bit risky, honestly.
After a delay of at least 1.2 seconds, she can unleash a special attack. This attack first deals a small amount of damage to all enemies on screen. Then, it follows up with a series of attacks specifically targeting enemies that have been locked on, ignoring any others.
If you’ve locked onto multiple enemies and one dies before your follow-up attack lands, the attack will automatically target a different locked-on enemy. However, if an enemy dies after the attack is launched but before it hits, the attack will be lost.
Note about Effect 2 of Auto Fire
Although the skill is designed to fire a series of attacks depending on how much ammo is loaded, any uncharged attack resets the process. This means that in normal gameplay, it will always fire exactly five attacks in a row – you can’t make it fire fewer than that.
This skill is her primary source of damage and allows her to quickly eliminate enemies. The amount of damage it provides is significant, particularly during the campaign. What’s great is that this strong damage output is consistent, even without investing in upgrades – she’s effective from the very beginning thanks to how often her attacks land.
Snow White: Heavy Arms
Liberalio
Helm (Treasure) (S1 Level 10)


Dealing burst damage to bosses is twice as effective. Although Liberalio and Helm (from Treasure) will charge faster against bosses, SWHA still generates the most burst damage overall in regular gameplay.


When fighting enemies with multiple parts, consistently hitting them with regular attacks quickly builds up significant damage. The more parts an enemy has, the faster this damage increases. Other powerful attack strategies don’t offer this same benefit of building damage so efficiently.
SWHA excels at quickly building her ultimate ability thanks to her Skill 1, both during campaign levels and when fighting bosses. In regular stages and player-versus-player battles, Skill 1’s wide-area attack generates ultimate energy for each enemy it hits, including during normal attacks and its follow-up strikes. This means the more enemies present, the faster she can charge her ultimate.
Okay, so when it comes to taking down bosses, I’ve found that SWHA just melts them. She can string together five quick hits, then add a screen hit for extra damage, and if I aim right with her Piercing attack from Skill 2, hitting weak points really ramps up the damage. Honestly, she has the highest potential for a quick burst of damage of any single character I’ve used. The only thing that’s faster is Grave after he uses his burst skill with a ton of machine guns, but that’s kinda unreliable and needs the whole team to set up, while SWHA can do it all by herself.
Note about the last two parts of S1
While her Burst is active, using a regular attack doesn’t decrease her Burst ammo. This can be helpful when using autoplay – if a boss teleports during a charge attack, the boosted attack won’t be lost. Frequent teleporting won’t waste ammo, though it will still take time.
As a player, I’ve noticed that if my Full Burst ability ends and I still have some Burst ammo left, my next regular shot gets a damage boost, but all that leftover ammo just disappears! It’s a bit annoying because it feels like a waste. Honestly, if you’re playing it right, you shouldn’t even have any ammo left over when Full Burst finishes.
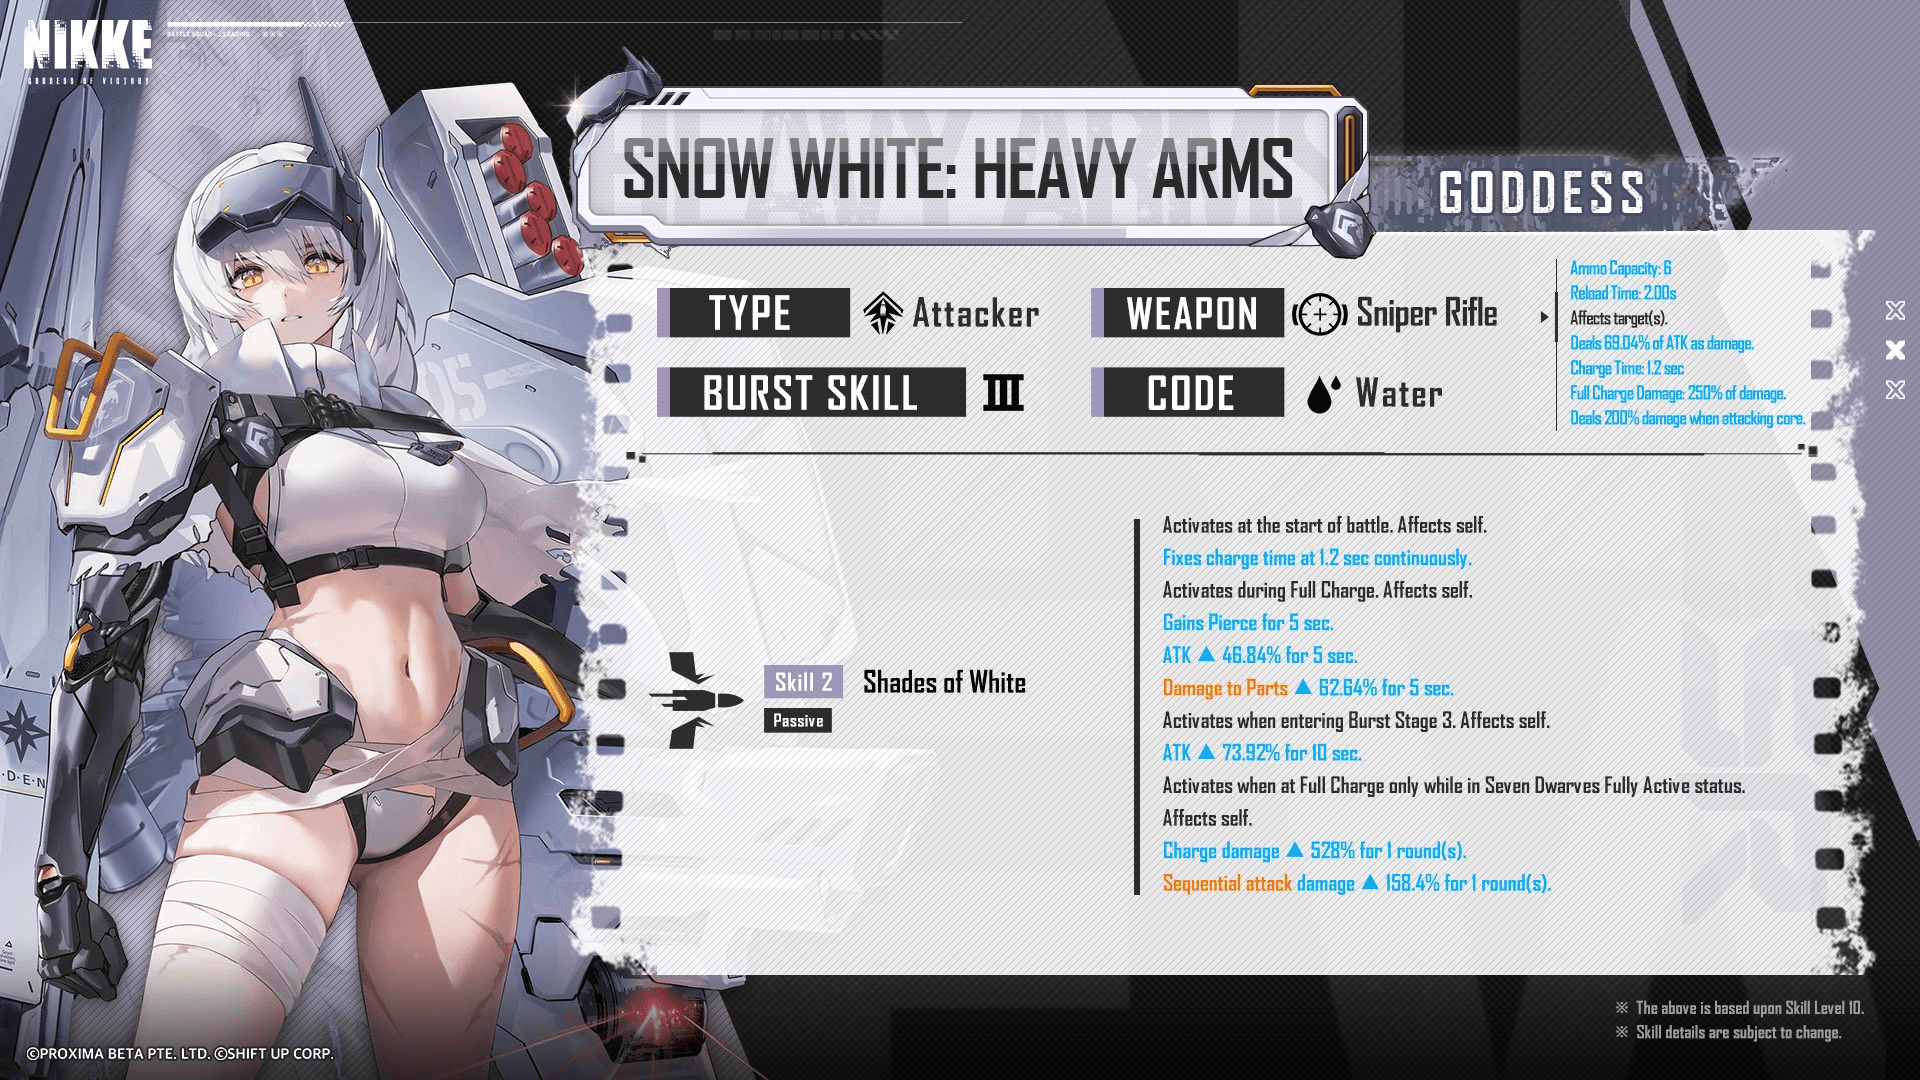
Skill 2: Shades of White
This skill has several effects that activate during battle. At the start of battle, it consistently reduces charge time to 1.2 seconds. When fully charged, it grants Pierce for 5 seconds, increases attack power by 46.84% for 5 seconds, and boosts damage to enemy parts by 62.64% for 5 seconds. Entering Burst Stage 3 further increases attack power by 73.92% for 10 seconds. Finally, when fully charged while the Seven Dwarves are fully active, it massively increases charge attack damage by 528% and sequential attack damage by 158.4% for one round.
Snow White always takes 1.2 seconds to charge her skill. Buffs that normally speed up charging from teammates or other sources won’t affect her, but she also won’t be slowed down by enemies who try to increase her charge time.
Whenever Snow White fully charges her ability, she significantly boosts her attack power, her regular attacks pierce through enemies, and she deals extra damage to enemy parts – making her especially effective against bosses with multiple components.
This effect activates when Snow White’s charge is full, not when she fires a fully charged shot. This means she’ll get the benefit right away, with her very first attack. Because her charge time is shorter than how long the buffs last, they’ll essentially stay active for the entire battle.
Reaching the third stage of her Burst ability significantly boosts her attack power. This bonus activates immediately upon entering that stage, meaning she benefits from it constantly, even if she doesn’t actually use her Burst. Because she generates Burst energy so quickly, this attack boost will be active for a very high percentage of the time.
As a huge Snow White fan, I’m really excited about how her Burst works! When it’s active and she fills up her charge, her next attack gets a massive damage boost, and all the attacks that follow get stronger too. What’s really cool is that this boost happens immediately when she reaches Full Charge – not after she fires a shot. This means both shots from her Burst get that incredible damage increase, making it super powerful!

You’ll see a big increase in the Charge Damage meter – it goes from 266% to over 700% – and the message “SVD FULL ACTIVE” will appear. This indicates that the final stage of Skill 2 has been activated.
Just a heads-up: the damage increase from the final part of Skill 2 (the ‘sequential attack’ boost) is calculated using your base Attack Damage, not your total Attack. This means the boost won’t be as high as you might think, but it’s still a significant increase.
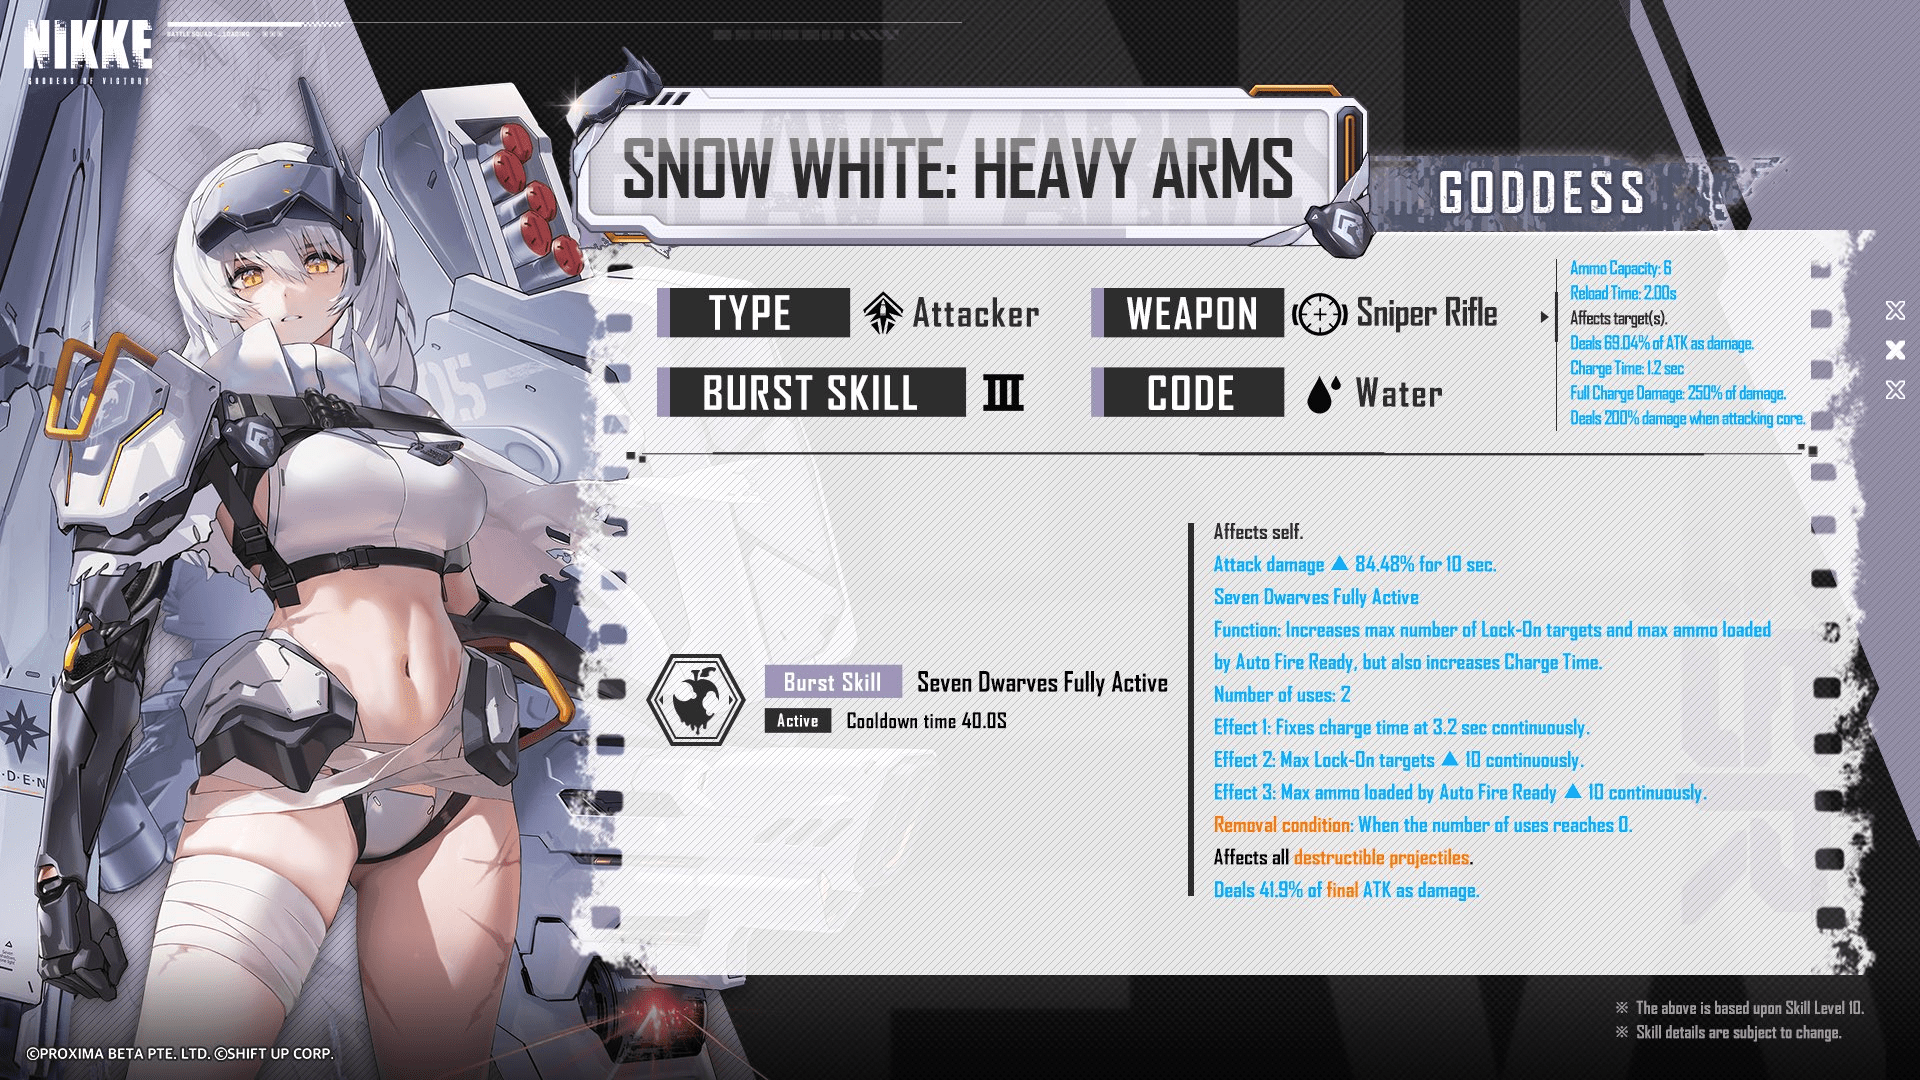
Burst: Seven Dwarves Fully Active
Cooldown: 40 sec.
This item impacts your self-damage. It boosts your attack damage by 84.48% for 10 seconds when all Seven Dwarves are active. It increases the number of targets you can lock onto and the amount of ammo Auto Fire Ready can load, but it also slightly increases charge time. You can use this item twice.
Here’s what it does:
Effect 1: Sets charge time to 3.2 seconds consistently.
Effect 2: Increases the maximum number of lock-on targets by 10 continuously.
* Effect 3: Increases the maximum ammo loaded by Auto Fire Ready by 10 continuously.The item stops working when you’ve used it twice. It affects all destructible projectiles, causing them to deal damage equal to 41.9% of your final attack power.
Okay, so when I activate Burst with SWHA, her attack damage gets a massive boost for ten seconds – it really stacks well with the attack buff from her Skill 2! She also launches a bunch of missiles, but here’s the cool part: they only destroy incoming projectiles, not actually hurt enemies. The biggest change though is to her weapon. For her next two shots, the charge time gets a lot longer, going from 1.2 seconds to 3.2 seconds. But, it’s worth it because…
- The number of targets she can lock onto is tripled from 5 to 15.
- The number of sequential attacks performed is tripled from 5 to 15.
- From S2, she will massively boost the charge damage of basic attacks and increase the damage of her sequential attacks.
This ability works wonderfully during regular gameplay, but is incredibly powerful against bosses. When focused on a single target, landing 15 or more consecutive, enhanced attacks significantly increases damage with each use of Burst. After unleashing these two powerful shots, the character reverts to their normal weapon for the rest of the Full Burst duration.
Campaign
SWHA excels in campaign mode due to her exceptional ability to quickly eliminate groups of enemies and deal consistent damage with each attack. She can function as either a powerful burst damage source for a team or a primary damage dealer. Her ability to slightly reduce incoming damage for allies, combined with her effective wave clearing, makes her a valuable asset to campaign teams, even if she isn’t the ideal element for the content.
When facing enemies weak to water, SWHA is the most effective unit to use. She generally outperforms other strong water damage dealers in terms of both how quickly she builds up damage and her overall damage output. Plus, she’s flexible and can be easily added to most teams without needing to build the entire team around her.
Avoid using SWHA against volleyballs. They easily trigger a powerful counterattack from the volleyball’s screen hit, making it hard to defeat with typical strategies like spreading damage, using Ein’s special damage, or trying to eliminate it with a single strong attack. The screen hit can repeatedly activate the volleyball’s counter if you don’t interrupt it.

blocks your path
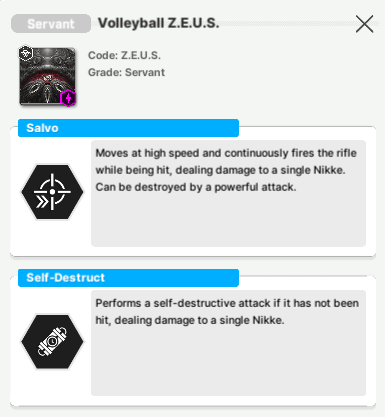
The ability only activates as a response to being attacked, specifically if the attack doesn’t defeat it immediately. Getting hit by Snow White’s Skill 1 will trigger this reaction.
If a map features Volleyball enemies and you’re having trouble completing it while using Shining Wind, Hazel (SWHA), it’s best to avoid using her. Although her Skill 1 is good for quickly generating energy, it actually makes dealing with Volleyballs harder. This also applies to maps where Volleyballs are near Pilgrim or Over-Spec towers.
Arena
In arena battles, Shadow Hunter Artemis (SWHA) currently excels at quickly building up burst damage, especially at the beginning of a fight. Her skill 1 and consistent 1.2-second charge time make her slightly faster than Helm and significantly faster than most other high-damage dealers, allowing her to unleash powerful attacks sooner in PvP.
Automatic weapons deal a lot of initial damage because each attack actually strikes 12 times right at the beginning of a battle. This is due to 5 hits from the full-screen attack on enemies, followed by 5 consecutive attacks, and then 1 attack that goes through both the enemy and any cover they’re using.
SWHA can function as a team’s primary damage dealer with her powerful burst ability, or as a consistent, high-damage attacker. Her burst attack is similar to Emilia’s, and benefits from having allies like Blanc or taunters protect her while she charges up and delivers strong attacks.
Although her damage output decreases as enemies are eliminated, it doesn’t drop quickly enough because her rapid attacks still land many hits. Especially at the start of Arena matches, she deals maximum damage. Even later in the match, her damage remains very high, and often the initial burst of attacks is enough to win, given how quickly Arena matches usually end.
Special Interception | Union Raid | Solo Raid
If a boss is weak to Water, be ready! This character is incredibly effective against them, with only one exception. She deals massive damage, can boost her own stats to work well with any team without much setup, and consistently maintains high damage output throughout a fight.
Snow White excels in various situations thanks to her ability to quickly generate burst damage and significantly boost her own stats. She can effectively function as a secondary damage dealer, providing burst support, extra damage, and a consistent damage vulnerability on enemies. With the right build, she can even be the team’s main damage source. She’s particularly strong against bosses, especially those with vulnerable points that her normal attacks can exploit.
When fighting bosses that fight solo, you don’t need much special setup. The S1 ability and Burst attack in SWHA are very effective against single targets, quickly dealing a lot of damage because all attacks focus on the same enemy.
When fighting bosses that create additional enemies, like the Harvester in Anomaly Intercept, SWHA effectively eliminates those extra enemies, allowing you to concentrate your attacks on the boss. However, remember that as long as these enemies are appearing, your attacks will automatically target them instead of the boss.
If the first attack from Player 1 doesn’t land, or if their basic attack doesn’t finish off the enemy before the follow-up attacks, there will be a slight decrease in damage output, as those follow-up attacks won’t hit effectively without extra assistance.
Okay, so when I’m fighting bosses that summon adds, I’ve learned it’s super helpful to bring characters who can hit multiple enemies at once. This really helps my main damage dealer, SWHA, keep her attacks focused on the boss. It’s especially important for when she uses her big burst attack – that thing triples her normal attacks, and each one does a ton more damage, but only if she’s consistently hitting the right target!
Examples of units that can deal with mobs alongside SWHA, to maximize DPS against the primary boss.
Note: Bready will need a Distributed Damage buff to enable her to deal Distributed Damage
Beyond these dedicated teams, using rocket launchers or units that quickly eliminate large groups of enemies will also significantly boost SWHA’s damage output against the boss.
When fighting Black Snake, SWHA will need a dedicated team strategy. While Black Snake is vulnerable to Water attacks, it’s prepared for them. Its clones will only take 1 damage from any other attack type. As long as these clones remain, they’ll deflect incoming attacks from the main boss, significantly lowering overall damage output – to about a third of what it could be – unless the clones are destroyed first.
When fighting Black Snake with SWHA, you need a solid strategy. Either bring allies who can quickly eliminate the clones to limit damage, or focus on dealing massive damage to destroy them in one hit. SWHA can’t effectively handle the clones by herself.
Examples of Distributed Damage units to use vs Black Snake
Note: Bready will need a Distributed Damage buff to enable her to deal Distributed Damage
Besides using Distributed Damage, machine gun units are effective at eliminating clones. Prioritize taking them out before concentrating all your firepower on the boss.
When tackling Solo Raids, Miranda (Treasure) – or MirandaT – is the clear best support character. She doesn’t benefit as much from other B1 supports, as her unique abilities – a guaranteed critical hit on her first attack and high critical damage – work exceptionally well with her kit.
Even though the extra attack from MirandaT won’t have a higher critical hit chance, maximizing its damage is very beneficial for Strength Water Hunting Attacks, particularly since no other Water damage dealers use her set as effectively. Buffs to Liter and Volume won’t affect this extra attack, and other beginner-level support characters don’t provide enough of a boost to make it worthwhile.
SWHA maintaining the tradition of functioning well with MirandaT that all her alters maintain.
Strengths
- Highest burst gen floor and potential in the game by far.
- Permanent slight damage taken debuff against any enemy.
- Destroys parts like it’s nothing thanks to Pierce and huge Damage to Parts self-buffing.
- Auto-friendly; recommended to play like this if you can’t manual properly.
- Incredible DPS regardless of content.
- High self-buffing gives her a lot of buffer independence and power in element neutral content.
- Whittles down mobs, allowing full focus on important targets, like the boss.
- Incredible PvP prowess thanks to how her kit works.
- Even with so much capability in Parts destruction, she still performs well vs partless bosses, because of sequential attack DPS.
Weaknesses
- Suffers against enemies that take fixed damage.
- Sequential attacks function make it difficult to focus down on individual enemies in campaign, even with burst active.
- Wave clear potential falls off past high deficit; her burst generation is still crazy, though.
- Fixed charge time is a nerf, as she can’t benefit from charge speed buffs, resulting in fewer ways of increasing personal DPS.
Rating
| Category | Rating |
|---|---|
| Overall | SSS |
| Story | SSS |
| Bosses | SSS |
| Arena | SSS |
Recommended Cubes
If you’re using a Sniper Rifle, you don’t use much ammo, and upgrades don’t help much beyond boosting its core stats. Focus on getting the strongest upgrade cubes you have – Resilience or Bastion are best, but prioritize Resilience, especially if your rifle starts with low ammo.
As a fan, I’ve found the Piercing Cube is really great for boosting my character’s regular attacks, which is awesome! Just a heads-up though, it doesn’t help with her combo attacks. If I’m playing her in campaign and focusing on consistent damage rather than big bursts, the Piercing Cube is definitely the way to go to get her passive damage output up.
SWHA with Tempering Cube can be annoying to face in PvP.
Doll Priority
Although Sniper Doll doesn’t significantly boost her damage output, she’s a top priority. The combination of damage reduction and increased defense, along with her Skill 1’s defense boost, keeps her alive against enemy attacks in both campaign missions and boss fights. Because she often stays in the open, this protection is a huge advantage that the doll provides.
Beyond that, she has naturally high stats that make her very effective later in the game. Because she’s useful in all game modes – story missions, boss battles, and player versus player combat – spending resources to enhance her is a worthwhile investment.
Expected Skill Priority
| Nikke | Budget Skill Investments | Recommended Skill Investments | Skill Priority | Notes | Investment Priority |
|---|---|---|---|---|---|
| Snow White: Heavy Arms | Skill 1: 7 Skill 2: 7 Burst: 7 | Skill 1: 10 Skill 2: 10 Burst: 7 | S1 = S2 | Skill 1 is where her a large part of her DPS comes from; the screen hit, sequential attacks, slight damage taken debuff. Skill 2 provides her self-buffing; The semi-permanent attack buff, Damage to Parts, boosting the benefits of using Burst, it’s a must have. Burst is where SWHA gets a powerful Attack Damage buff; that being said, Attack Damage is one of the most common buffs from S2 supporters. It can be maxed, though it is of a lower priority. | Highest |
Overload Gear Priority
Gear Priority = Head > Gloves > Chest > Boots
| Attribute (Sub-Stat) | Priority | Recommended | Notes |
|---|---|---|---|
| Increase Element Damage Dealt | ★★★★★ | 4x | Wanted for Union Raids and Solo Raid content. |
| Increase Hit Rate | ☆☆☆☆☆ | 0x | — |
| Increase Max Ammunition Capacity | ★★★★☆ | 1-2x | Due to her low ammo consumption, she doesn’t need ammo as much as her contemporaries. Try to aim for 1 high ammo line, or 2 low/medium ammo lines at most. |
| Increase ATK | ★★★★☆ | 3 – 4x | Simply more damage. Considering how much ATK she gives herself from S2, though, it’s not as beneficial as aiming for more elemental attack. |
| Increase Charge Damage | ☆☆☆☆☆ | 0x | The bulk of her damage is from sequential attacks, which Charge Damage doesn’t benefit. Burst buff also dilutes its benefit. |
| Increase Charge Speed | ☆☆☆☆☆ | 0x | As a unit with fixed charge time, charge speed is useless for her. |
| Increase Critical Rate | ★★★★☆ | 2 – 3x | Recommended to increase her general DPS in campaign. Not as useful in raids if using her with MirandaT. |
| Increase Critical Damage | ★★★★☆ | 2 – 4x | While the benefit is slight without MirandaT, it’s the best DPS up outside of elemental damage and ATK because it increases the benefit of playing with MirandaT. |
| Increase DEF | ☆☆☆☆☆ | 0x | Though she has a big self-DEF buff from S1, there is no need to get anymore. |
Read More
- Clash Royale Best Boss Bandit Champion decks
- Vampire’s Fall 2 redeem codes and how to use them (June 2025)
- Mobile Legends January 2026 Leaks: Upcoming new skins, heroes, events and more
- M7 Pass Event Guide: All you need to know
- Clash Royale Furnace Evolution best decks guide
- World Eternal Online promo codes and how to use them (September 2025)
- Clash Royale Season 79 “Fire and Ice” January 2026 Update and Balance Changes
- Best Arena 9 Decks in Clast Royale
- Clash of Clans January 2026: List of Weekly Events, Challenges, and Rewards
- Best Hero Card Decks in Clash Royale
2026-01-07 20:43